Testing a print page is crucial to verify your printer's functionality and identify any printing problems like smudged ink, misaligned text, or paper jams. Don't fret! Our comprehensive guide will effortlessly walk you through the process of how to print test page on Windows and Mac. Rest assured, we've got you covered!
This how-to test print guide will cover the following topics:
- Print Test Page: Why It’s Essential
- How To Test Print: Step-by-Step Guide
- Test Print Guidelines for Color and Greyscale Printing
- Printer Test Page Result and Solution
Print Test Page: Why It's Essential
A printer test page helps you detect potential printing problems early, assess your printer's performance, and check the ink or toner levels and nozzle functionality status. Regularly printing test pages can prevent major issues, save resources, and ensure accurate colors in your prints.
What Does a Test Print Show?
A printer test page shows various details regarding your printer's performance, such as alignment, print quality, color reproduction, and if there are any issues with the ink or toner cartridges.
What To Check First Before Printing A Test Page
- Paper Type and Size: Ensure the correct paper type and size are loaded in the printer.
- Printer Connection: Confirm the printer is properly set up and securely connected to your computer or network.
- Printer Status: Check for warning lights or error messages that may affect the printing process. Ensure to resolve any existing issues before printing the test page.
- Ink or Toner Levels: Check the ink or toner levels to ensure a sufficient supply for a high-quality test page. Avoid printing if ink levels are critically low or empty, as it can damage printheads and produce poor print quality.
- Print Queue: Verify that no other print jobs in the queue may interfere with or delay the test page printing.
How To Test Print: Step-by-Step Guide
Now, let's talk about how to test print. The process varies slightly depending on the printer brand and model, but typically it involves navigating through your printer's settings menu or launching a print test from your computer.
How To Print Test Page on Windows
Windows XP
- Step 1: Click the 'Start' button > 'Control Panel' > 'Printers and Faxes.'
- Step 2: Right-click on your printer, then click 'Properties.'
- Step 3: From the popup, click on 'Print a Test Page'; click on 'Okay' after it's done to close the popup.
Windows Vista
- Step 1: Click the 'Start' button > 'Control Panel' > double-click on 'Printer.'
- Step 2: Right-click on your printer, and then click 'Printer Properties.'
- Step 3: Click 'Print a Test Page' from the popup; click on 'Okay' after it's done to close the popup.
Windows 7
- Step 1: Click the 'Start' button > 'Control Panel' > 'Hardware and Sound.'
- Step 2: Go to 'Devices and Printers' > 'Printer Properties' > right-click the printer icon.
- Step 3: From the submenu, left-click 'Printer Properties.'
- Step 4: Within the Printer Properties window, click on the 'Print Test Page.'
Windows 8/8.1
- Step 1: Press 'Windows' key on your keyboard > 'View Devices and Printers.'
- Step 2: Locate your printer, right-click on it, and click on 'Printer Properties'
- Step 3: From the popup, click on 'Print a Test Page'; click on 'Okay' after it's done to close the popup.
Windows 10
- Step 1: Click on the 'Windows' icon and select Settings.'
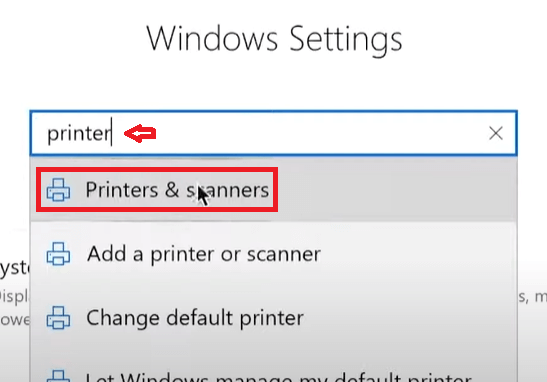
- Step 2: On the search bar, type “printer” and then click 'Printers & scanners.'
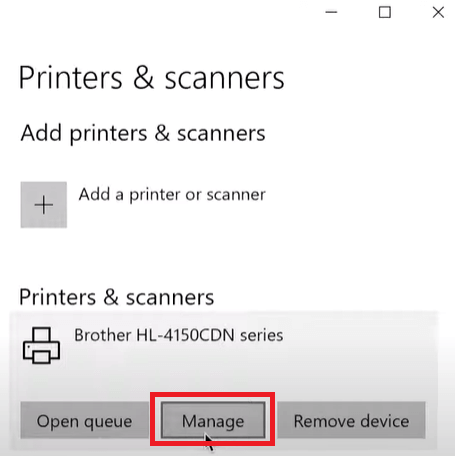
- Step 3: Next, click on the printer you want to print a test page and click 'Manage.'
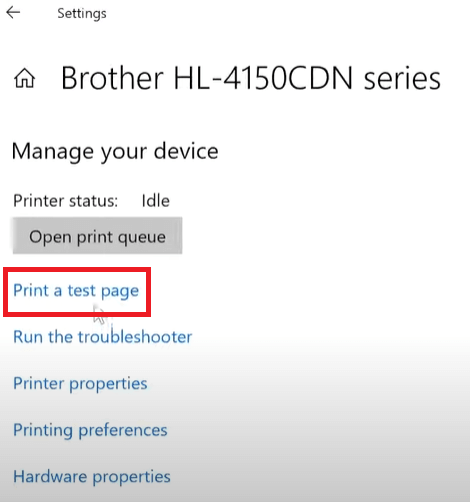
- Step 4: Once in, click on the 'Print a test page.'
Windows 11
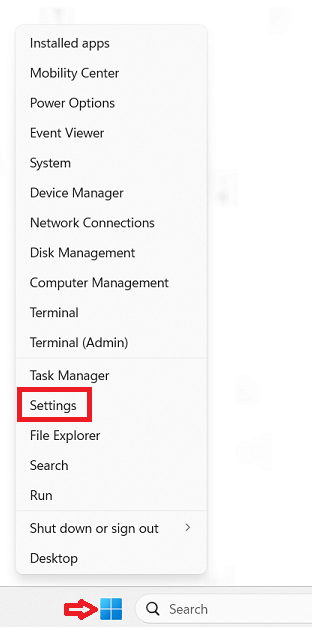
- Step 1: Left-click on the Windows icon and select 'Settings' from the list of options.
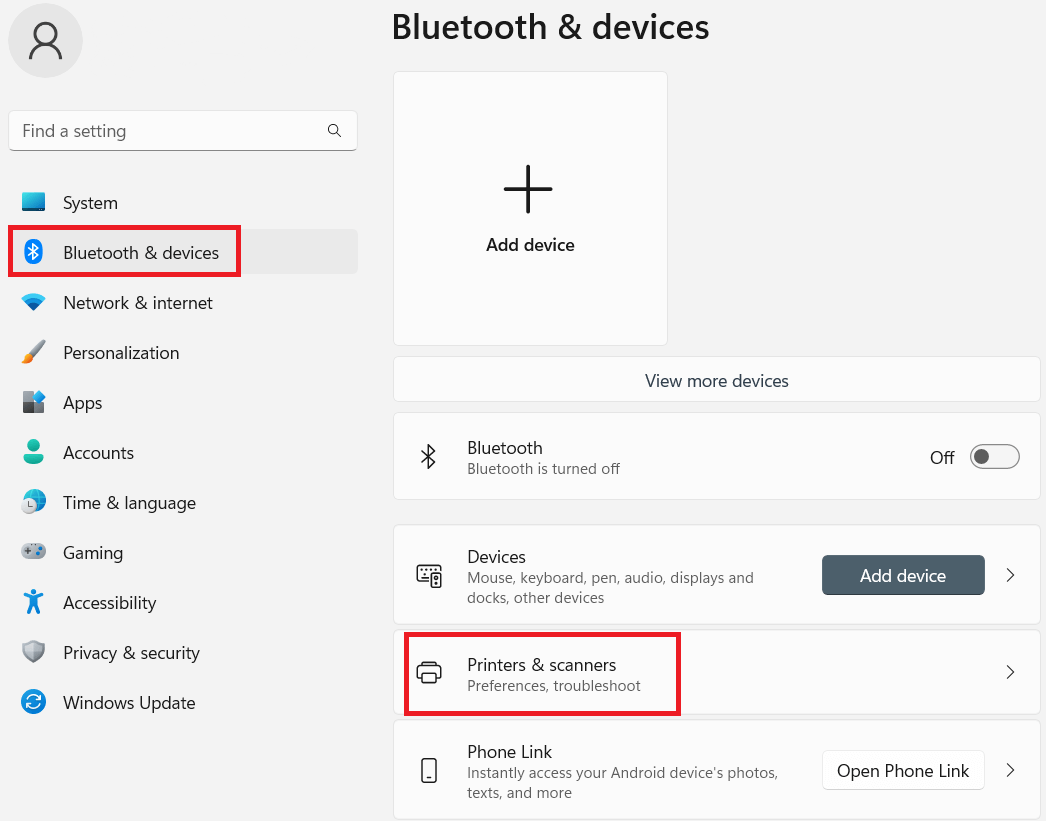
- Step 2: Click on 'Bluetooth & devices,' and then click on 'Printers & scanners.' From the list of printers, choose the one where you want to try to print a test page.
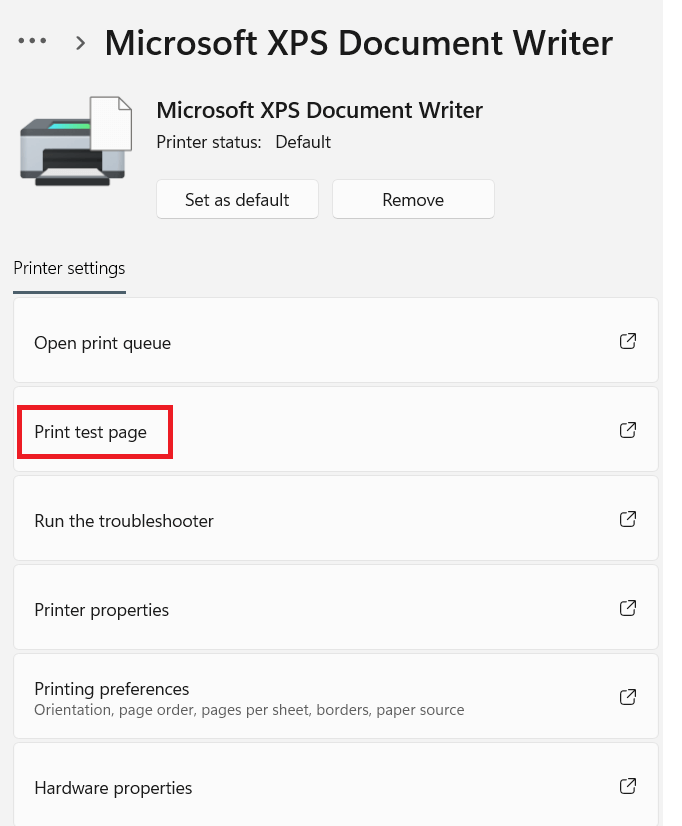
- Step 3: Once in, click on the 'Print test page.'
How to Print Test Page on Mac?
Mac OS Version 1
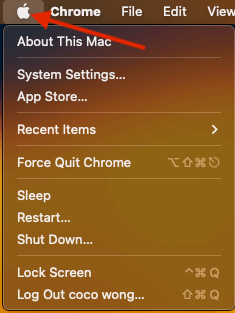
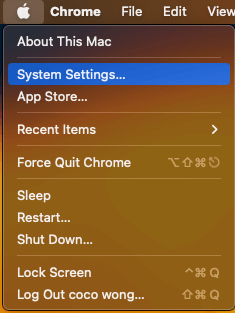
- Step 1: Click on the Apple menu.
- Step 2: Now click on System Preferences or System Settings.
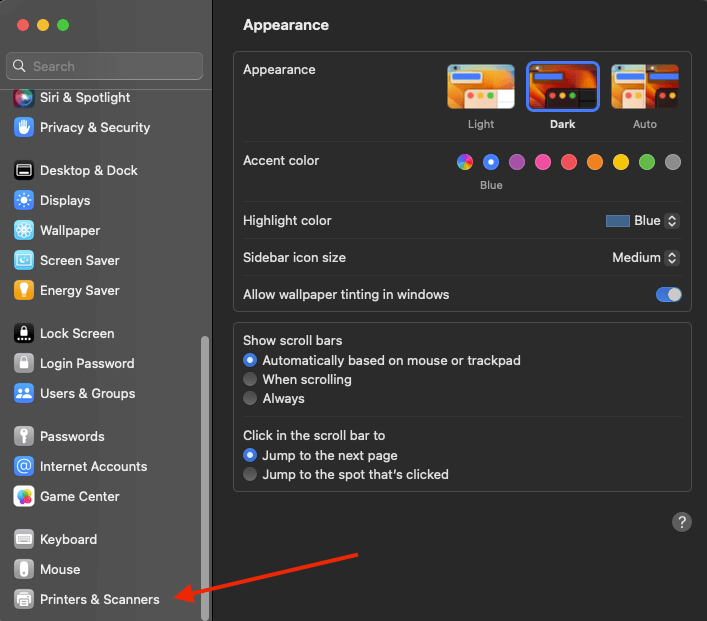
- Step 3: Hover over to Print & Fax, or it might be Print & Scan or Printers & Scanners, depending on your Mac OS X version.
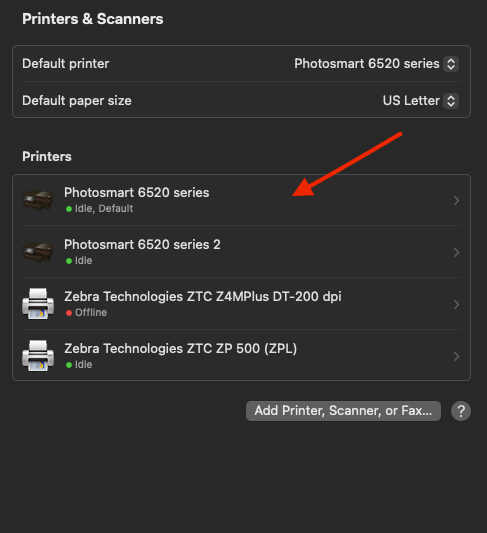
- Step 4: You'll see a printer listing on the life side window; select your printer.
- Step 5: Click on Open Print Queue.
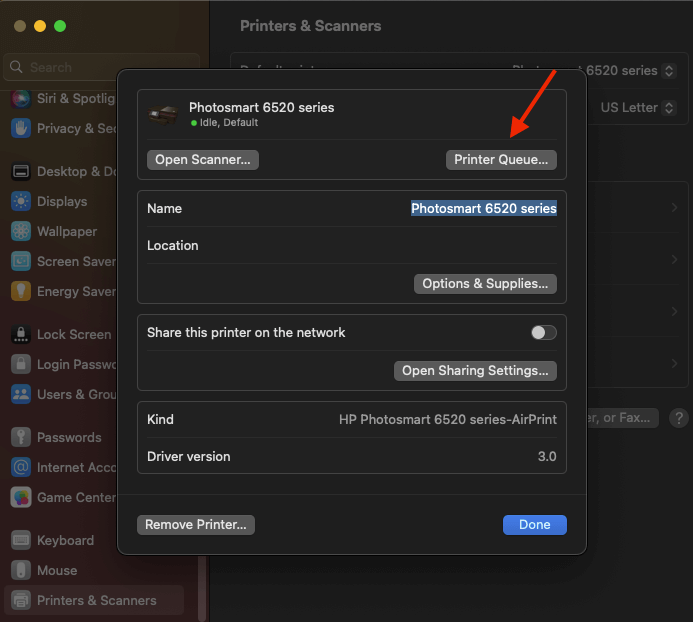
- Step 6: Now click on the Printer menu at the top and then select Print Test Page
Mac OS X
- Step 1: Click on the Apple menu.
- Step 2: Now click on System Preferences or System Settings.
- Step 3: Hover over to Print & Scan or Printers & Scanners, depending on your Mac OS X version.
- Step 4: You'll see a printer listing on the life side window; select your printer.
- Step 5: Now select 'Option and Supplies.'
- Step 6: In the new window, go to the 'Utility' tab and click on 'Print Test Page'.
Test Print Guidelines for Color and Greyscale Printing
These guidelines help assess color accuracy, ink coverage, image details, and text clarity. The process for printing a color printer test page or getting a black-and-white text page is the same as provided above, depending on your operating system and printer brand.
Color Printer test pages must include the following:
- Printer color test: A section that includes a color gradient or color wheel is essential to evaluate the accurate reproduction of different colors and shades.
- Printer ink test: A test area with varying percentages of ink coverage (for example, from 10% to 100%) to check if the printer can consistently print different ink densities.
- Image quality assessment: A high-resolution image or a complex pattern demonstrating the printer's capability to accurately reproduce intricate details and sharp lines.
- Text quality evaluation: Text in various font sizes and styles must be present to test the printer's ability to render text clearly and legibly across different settings.
Greyscale Printer test pages must include the following:
- Black and white test print: A section that includes a greyscale gradient, ranging from pure black to pure white, allowing users to assess the printer's ability to reproduce various shades of grey.
- Black print test: A section containing solid black shapes or patterns to evaluate the printer's ability to produce consistent and uniform black coverage.
- Printer test pattern: Geometric shapes, lines, and grids must be present on the greyscale test page, testing the printer's precision in both printing straight lines and maintaining alignment.
- Text quality evaluation: Similar to the color printer test page, text in various font sizes and styles should be included to examine how well the greyscale printer renders text with good contrast and clarity.
Printer Test Page Result and Solution
After you finish the test prints, you need to inspect the page and see if any issues need fixing. The most commonly reported issues are given below:
- No print on the test page.
- Ink smudging or color discrepancies.
- Faint or patchy prints.
- Misaligned grids or bars.
- Striped or line patterns on prints.
Recommended Solution:
- Step 1: Ensure that the printer is properly connected to your computer and that there is no jammed paper. Also, check that the ink or toner cartridges are installed correctly and are not low on ink or toner.
- Step 2: Remove ink from the printer and inspect them for dirt or damage.
- • If dirty, proceed to Step 3.
- • If damaged, replace it.
- Step 3: Clean the printhead if it is dirty or clogged. You can run a printhead cleaning cycle or clean it manually. Check our printhead cleaning guide for step-by-step instructions.
Parting Words:
In this guide, we have discussed how to print a test page on both Windows and Mac systems. Remember that the test page itself won't fix any specific printer issues; rather, it assesses the printer's performance. Should you encounter problems with the printer's output, such as poor print quality, paper jams, or connectivity issues, the test page can aid in identifying the problem. However, addressing the specific issue will require further troubleshooting and problem-solving steps.
By following the steps outlined in this how-to test print article, you can learn not only how to print a test page but also how to interpret its results to effectively identify and fix any printer-related problems. We genuinely hope you find this article helpful. Check our website for more useful articles about ink/toner and printers. Happy printing!
Frequently Asked Questions:
When and how often should I print a test page?
Printer owners should print a test page at least once a month. Aside from doing so can prolong the life of your printer, it also helps verify that the printer is functioning correctly and maintaining its performance.
Here are some instances when you should print a test page:
- When using a new printer or updating printers. This determines whether the drivers are installed correctly and verifies the printer's ability to produce a high-quality output.
- After installing a new ink or toner cartridge(s). This is to determine if the new cartridges are working correctly and that there are no issues, such as poor print quality due to improper installation, leakage, or blockage of print nozzles.
- Before using your printer after a long period of inactivity. This ensures that your printer remains in optimal working condition and the ink does not dry out.
Why do you need to run a printer test print?
- Detect potential problems early: A printer test print can help you identify potential printing problems early, such as ink smudging, color calibration problems, or alignment discrepancies. This allows you to take steps to prevent them from becoming more severe.
- Efficient troubleshooting: By printing a test page and looking at the results, you can identify the specific ink cartridges or components causing the problem. This helps you narrow down the troubleshooting process and resolve the issue faster.
- Assess your printer's performance: By looking at the test patterns and results, you can see how well your printer is printing and identify any areas that need improvement.
- Check your printer's ink and nozzles: By printing a test page, you can confirm that all ink colors are being dispensed correctly and that the nozzles are free from clogs or blockages. This prevents problems like streaky pages, ghosting colors, or uneven printing.
- Get accurate colors: A printer test print can help you calibrate your printer and get accurate colors by printing a test page and comparing the colors on the print to the colors on your screen.
- Saving resources. By spotting and resolving printing issues before they become major problems, you save paper and ink, reducing waste and cutting unnecessary expenses.
What is the shortcut key to print a test page?
There isn't a dedicated shortcut key to print a test page. You need to access your printer's properties and choose the option to print a test page. Alternatively, you can press the print function shortcut key (Ctrl + P) to print a regular page if you already have a page graphic set up to print.
Why can't I print a test page?
If you cannot print a test page, there may be an issue with your printer's connection to your computer, driver issues, or hardware problems like low ink levels or paper jams.
Printer will print test page but nothing else. What should I do?
To troubleshoot the issue of your printer only printing test pages, follow these steps:
- Check printer connections and ensure they are secure.
- Restart the printer and computer to resolve temporary glitches.
- Check paper and ink/toner levels.
- Ensure printer is set to default.
- Clear the print queue of any stuck jobs.
- Run printer diagnostics if available.
- Reset printer settings to defaults if needed.
- Contact the manufacturer's support for further assistance.