Printers are essential to many people's day-to-day lives, but their inner workings can be a bit confusing. If you're the proud new owner of a Brother printer, you may wonder when and how to replace drum on Brother printer. Don't worry; we'll help!
In this guide, we will discuss the following:
- Imaging Drum 101: Understanding the Drum's Role
- When to Replace Drum On Brother Printer?
- Before Brother Drum Replacement: Precautions and Tips
- How to Replace Drum on Brother Printer: 10 Easy Steps
- After Brother Drum Replacement: What to Do Next?
- Common Issues & Solutions After Replacing Brother Drum
Ready to jump in? Let's get started!
Imaging Drum 101: Understanding the Drum's Role
To understand the importance of replacing Brother drum, it's essential to comprehend its role.
Function
In the printing process, the drum, which is cylindrical in shape and electrically charged, serves as a critical intermediary between the toner and the paper.
Task
Responsible for transferring toner powder onto paper, mainly using heat.
Importance
- Without the drum, printouts would exhibit faded, blotchy quality.
- Ensures even toner distribution on paper, preventing lines or spots with insufficient toner coverage.
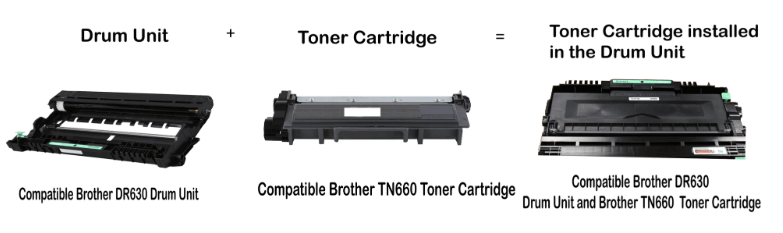
Brother printers come in different shapes and sizes, and most of them come with a separate toner and drum unit. The reason behind this, as per Brother, is:
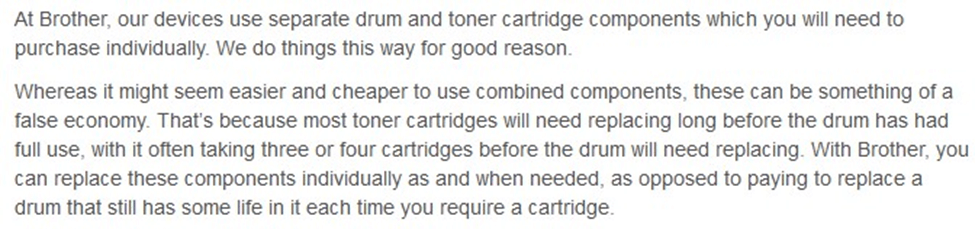
Credits: Brother UK
When to Replace Drum on Brother Printer?
It's worth noting that some printers will continue to work even after the "replace drum" warning, but it's advisable to keep a spare drum on hand to be prepared. Drum units typically last for about three toner replacements.
Here's a tip:
You can prolong the drum's life and maintain its performance by occasionally cleaning the corona wire. To do this, slide the small plastic piece attached to the corona wire back and forth a few times.
To determine if your drum truly needs replacement, look out for the following signs:
- Image Quality Declines:
If your prints become less sharp or clear, even after changing the toner, it's a sign that the drum may need replacing. - Printer Notification:
Follow your printer's notification to replace the drum when it prompts you. The "replace drum" light or message may appear, and it's best to heed this warning. - Squeaky Noises:
If your printer starts making squeaky sounds during operation, it's usually a sign that the drum or the fuser is worn out. This noise occurs when parts of the drum or fuser that are no longer in good condition rub against each other, creating a squeak.
Follow the steps in our how-to troubleshoot Squeaky or Grinding Noises from Printer guide.
Other Tips:
You can also determine if your drum unit needs replacement using this simple formula:
1 Drum Unit Yield = 15,000 pages (1 page per job)
However, even if you've reached the 15,000-page mark and the prints still maintain good quality, you can continue using them as long as you don't notice any issues. Once problems start to appear, it's time to consider a Brother drum replacement.
Before Brother Drum Replacement: Precautions and Tips
When replacing the drum of any printer, safety should be a priority. Before beginning the Brother drum replacement process, several safety precautions and tips should be followed to ensure a successful and smooth operation.
- Wear gloves and a mask:
Always wear protective gloves and a face mask before you start the Brother drum replacement process. This safeguards you from skin irritations and inhaling fine toner dust. - Turn off the printer:
Before you begin any maintenance work, make sure to turn off the printer. Doing this prevents the risk of electrical shock during the replacement process, ensuring your safety. - Allow the printer to cool down:
After turning off the printer, give it a few minutes to cool down. This precaution prevents burns from hot components inside the machine. - Avoid exposure to light:
Your Brother drum unit replacement is sensitive to light. Keep it away from direct sunlight or bright indoor lighting to prevent potential damage. - Clean the printer before installing the new drum:
Before you install the new drum, clean the interior of your printer by removing any accumulated dust or debris. - Familiarize yourself with the printer:
Take the time to understand your printer's components, including the toner and drum units, and how they fit together before attempting the drum replacement. You can find helpful tutorials on platforms like YouTube to guide you through this process.
How to Replace Drum on Brother Printer: 10 Easy Steps
Ensure to follow the precautions and tips above before replacing Brother drum. Once done, carefully follow the step-by-step instructions on "how to replace drum on Brother printer" below:
- Step 1: Turn on the printer and open the front cover.
- Step 2: Take out the toner and drum assembly.
- Step 3: Press down the green lock lever and remove the toner from the drum. Tip: Putting the assembly on disposable paper is a good idea in case you spill any toner.
- Step 4: Unwrap the new drum unit and insert the toner into the drum. Make sure it's placed correctly to avoid separation.
- Step 5: Slide the green tab back and forth several times to clean the corona wire. Remember to return the tab to its original position to prevent printing issues.
- Step 6: Install the drum and toner assembly into the printer and close the front cover.
- Step 7: Once done, press "Settings" on the printer's touchscreen.
- Step 8: Then, select "All Settings." From there, choose "Machine Info."
- Step 9: Use the ▲ or ▼ buttons to find "Parts Life" and select it.
- Step 10: Press and hold 'Drum,' confirm by pressing 'Yes,' and finally, press 'Home' to exit the menu.
After Brother Drum Replacement: What to Do Next?
1. Reset the drum counter:
After replacing the drum, be sure to reset it. This action ensures that your printer notifies you when it's time to replace the next drum unit, as failure to reset the drum might result in continuous "replace drum unit" messages and printer malfunctions.
Steps in resetting the counter:
- Step 1: Open the printer's front cover
- Step 2: Press and hold the 'Ok' button for 2-3 seconds
- Step 3: Now press the 'Up' arrow key or '1' key, and this will reset the counter
2. Schedule regular maintenance:
It's good practice to perform regular maintenance on your printer. Monitor your printer's operating status and clean it regularly as needed. This routine will help prolong its lifespan and ensure top-notch performance.
Common Issues & Solutions After Replacing Brother Drum
Here are some common issues that may occur after a Brother drum replacement and how to troubleshoot them:
1. Replace Drum Error:
If you see the 'Replace Drum' on your printer's display after replacing the drum, it's likely due to a faulty or damaged drum unit. To rectify the issue, try the following:
- Try reinstalling the drum unit to ensure it's properly seated.
- If the problem persists, the drum unit may have been damaged in transit or during installation, and you may need to get a new drum unit.
- Alternatively, as explained earlier, you can reset the drum counter to bypass this error.
2. No Printout:
- Ensure the printer is plugged in and the power button is turned on.
- Verify that both the toner cartridge and drum units are correctly installed.
- If there is still no printout, follow our step-by-step instructions on how to fix the printout issue.
3. Print Results Are Not as Expected:
- If the print results differ from what is expected, it could be due to a misalignment of the drum unit.
- Adjust the alignment settings in your printer's settings menu.
- If that doesn't work, uninstall the drum unit and reinstall it properly, ensuring correct alignment.
- If it doesn't work, follow our step-by-step instructions on how to fix the poor printing quality issue.
4. Cooling Down for a While:
This error indicates that the drum unit or toner cartridge has become too hot, causing the printer to enter a cool-down mode.
- Remove any obstructions in front of the machine's fan to improve cooling.
- If you don't hear the fan spinning, disconnect the machine, wait several minutes, and reconnect it.
5. Drum Unit Not Recognized:
Troubleshooting steps for drums with integrated toner and drums sold separately from toner may differ. Follow the steps that align with your specific situation.
If your printer uses a drum unit that is built into the toner cartridge:
If your printer is not recognizing the drum, there may be an issue with the gold chip on the toner cartridge. To address this, follow these troubleshooting steps:
- Step 1: Start by removing the cartridge drum from your printer and then turn off the printer to ensure safety.
- Step 2: Disconnect the printer from the power source by unplugging it from the wall or power outlet.
- Step 3: Allow the printer to remain empty and unplugged for approximately one minute. This short pause helps reset the system.
- Step 4: Take a soft, lint-free cloth, like a microfiber cloth, and gently wipe the gold-colored connection area on the cartridge drum. This step ensures a clean and proper connection.
- Step 5: Reconnect the printer to the power source by plugging it back into the wall or power outlet. Turn the printer back on.
- Step 6: Carefully reinstall the cartridge drum into the printer.
- Step 7: Finally, try printing a test page to check if the recognition issue with the gold chip has been resolved.
If your printer uses a separate toner cartridge and drum:
Below are the common issues why your printer is not recognizing drum units for printers that are using separate drum and toner:
- Drum Fitting Issues:
- Step 1: Verify that both the toner cartridge and drum unit are correctly and securely installed. Ensure the toner cartridge clicks securely into the drum unit.
- Step 2: Make sure the toner cartridge and drum unit are connected as a single piece before installation.
- Step 3: Slide the securely connected toner cartridge and drum unit into the printer for installation.
- Dirty Corona Wire
- Step 1: Confirm that all components are correctly installed, as mentioned in the previous steps.
- Step 2: Locate the green or blue tab on the drum unit.
- Step 3: Slide the tab back and forth across the drum unit 6-8 times.
- Step 4: Return the tab to its original position.
- Step 5: After cleaning the corona wire, try printing again to check if the error has been resolved.
- Drum Needs Resetting:
Follow the steps on how to reset the drum counter in reset the drum counter instructions above.
6. 'No Toner' Message:
If you receive a "No Toner" message after installing the new drum, it may indicate an issue with the toner cartridge's connection to the drum unit.
- Remove the toner cartridge and ensure it is securely connected to the drum unit without dust or debris.
- If the issue persists, consider replacing the toner cartridge
Parting Words
To sum it all up, when it comes to "how to replace drum on Brother printer," this comprehensive guide has equipped you with step-by-step instructions and crucial precautions.
It's crucial to always take the necessary safety measures, such as wearing gloves and a mask and powering off your printer before starting the replacement process. Also, maintaining your printer well is key to ensuring consistently high-quality prints for years to come.
We hope you find our Brother drum replacement tips helpful. For more articles and useful tips, visit our website. For concerns and inquiries, call our toll-free number: 1-833-465-6888. Our support is available Monday to Friday, 6am-4pm PT. Happy printing!
Frequently Asked Questions
What happens if I don't replace the drum in my Brother printer?
Ignoring the "replace drum" warning and not replacing the drum may result in poor print quality, including faded prints, streaks, and blotches on your pages. Moreover, it can damage your printer's other components and reduce lifespan.
How do I manually clean my printer drum?
To manually clean your printer drum, follow these steps:
- Turn off the printer and unplug it
- Open the printer's front cover of the printer and remove the toner cartridge and drum unit carefully
- Use a soft, dry, lint-free cloth to gently wipe any visible dust or debris from the surface of the drum.
- If necessary, use a bit of rubbing alcohol applied to a clean cloth to clean stubborn stains or marks gently.
- Once you're done cleaning, reassemble the toner cartridge and drum unit and reinstall them into your printer.
- Close the front cover, plug in your printer, and turn it on.
Are printer drums expensive?
Printer drum costs can vary significantly depending on the printer model and brand. Generally, drum prices range from around $40 to over $150.
For Brother drums that are sold separately from toner, it's important to note that while the cost may appear higher, they play a crucial role in preserving your printer's performance and lifespan. Typically, the drum unit has a longer lifespan than toner cartridges, meaning you only need to replace it occasionally.
How do I know when to replace the drum on my Brother printer?
When it is time to replace the drum in your Brother printer, you will receive a warning message or status light indicating that the drum needs replacement. It is essential to replace the drum as instructed to maintain optimal print quality and prevent any potential damage to your printer.
Can I replace the drum on my Brother printer, or do I need professional assistance?
You can typically replace the drum unit on your Brother printer using the user manual provided with your printer or by following the steps we've provided above. You should have no problem replacing the drum if you follow these instructions carefully.
How long does a drum unit typically last in a Brother printer?
The lifespan of a drum unit can vary depending on your printer model, print volume, and other factors. Generally, a Brother printer drum unit lasts approximately 12,000 to 15,000 pages. However, remember that this estimate can vary based on individual usage patterns and the frequency of toner cartridge replacements.
Index
- Imaging Drum 101: Understanding the Drum's Role
- When to Replace Drum On Brother Printer?
- Before Brother Drum Replacement: Precautions and Tips
- How to Replace Drum on Brother Printer: 10 Easy Steps
- After Brother Drum Replacement: What to Do Next?
- Common Issues & Solutions After Replacing Brother Drum