
"Why is my ink cartridge not working?" This is a common question when using a printer, whether you face the issue yourself or helping a friend. But before rushing to replace your newly bought cartridges or taking your printer to a technician, read this guide on how to fix the ink cartridge not recognized problem to address the issue. Additionally, check out this guide to troubleshoot common ink cartridge problems. Say hello to hassle-free printing in no time!
This guide will cover the following topics to help you resolve the issue:
- Why Is My Ink Cartridge Not Working: Common Reasons
- New Ink Cartridge Not Working: What Are Some Error Messages?
- Ink Cartridge Not Recognized: Troubleshooting Tips
- Ink Cartridge Cannot Be Recognized Issues: Tips To Avoid In The Future
Why Is My Ink Cartridge Not Working: Common Reasons
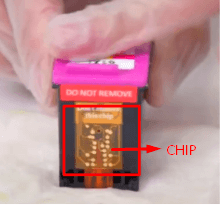
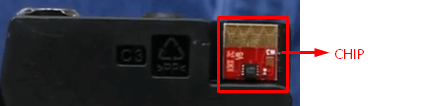
Printer cartridges have microchips that connect with the printer when installed. These chips help the printer count how many pages have been printed. When you put in a new cartridge, the printer resets and sees the new cartridge as full. The problem is, sometimes these cartridges cannot be recognized by the printer.
So, why does my printer not recognize my ink cartridge?
There are several reasons why your printer might not recognize a new ink cartridge. It's important to find out why before trying to fix it. So, here are some possible reasons why the new ink cartridge might not be working:
- The firmware has been updated.
- Wrong cartridge model was installed.
- The protective tape was not removed.
- Incorrect position or color slot of installed cartridges.
- The contacts in your printer or cartridge are damaged or dirty.
- The printer's memory has not reset and is still reading data from the previous chip.
- The printer hasn't been used for a long time, causing the cartridges and their metal contacts to dry out.
New Ink Cartridge Not Working: What Are Some Error Messages?
When your printer cannot recognize an ink cartridge, it will alert you. The ink, maintenance, or stop buttons on the printer will start blinking. You might also see a cartridge error message on the printer's LCD screen or on the status monitor. These cartridge error messages are generally similar across different printer brands. Here are some error message you may encounter:
- "Low ink."
- "Cartridge Problem."
- "One or more cartridges appear to be damaged. Remove them and replace with new cartridges."
- "Ink Cartridge Failure. Print cartridge(s) missing or not detected."
- "Toner is not compatible."
- "No cartridge installed."
Ink Cartridge Not Recognized: Troubleshooting Tips
Now that we know why your printer doesn't recognize the new cartridge and what error messages to expect, let's proceed with fixing the ink cartridge not recognized problem. We'll give you three simple tips for fixing the issue.
Tip 1 : Resetting the Printer's Memory
A. Reinstall the Old Cartridges
Your printer's memory might not have been cleared, and it is still detecting data from the used cartridge. To fix this, try reinstalling the old ink cartridge.
- Step 1: Uninstall the new ink cartridge.
- Step 2: Install the used cartridge in the printer.
- Step 3: Allow the machine to recognize the old cartridge for a few minutes.
- Step 4: Remove the used cartridge and replace it with the new one.
- Step 5: Check if your printer is now recognizing the new cartridge.
B. Restart the Printer
If it's still not working, try unplugging the printer to clear its memory.
- Step 1: Remove the new cartridge from the printer. To avoid ink leaks, place the cartridge on a flat surface with a paper towel underneath.
- Step 2: Turn off the printer.
- Step 3: Unplug the machine. Take out the power cord to erase the printer's memory.
- Step 4: Wait for at least ten minutes before plugging the printer again.
- Step 5: After plugging in, reinstall the new cartridge. Do not turn on the printer yet.
- Step 6: Once the new cartridge is in place, turn on the printer.
Tip 2: Clean the Metal Contacts of the Printer and Cartridges
If your ink cartridge isn't being recognized, it could be because the cartridge chips or printer contacts are dirty. You can solve this problem by cleaning them with a lint-free cloth and isopropyl alcohol.
- Step 1: Take out the new cartridges from the printer and place them on a flat surface with a paper towel underneath.
- Step 2: Turn the printer off and unplug it.
- Step 3: Locate the metal contacts of the cartridge.
- Step 4: Dampen a lint-free cloth with isopropyl alcohol and gently wipe the cartridge and printer contacts to remove dirt or residue.
- Step 5: Reinstall the new cartridges into the printer.
- Step 6: Plug in the printer and turn it on.
- Step 7: Print a test page to see if the cartridge issue is fixed.
Tip 3: Reinstall Printer Firmware
If your printer fails to recognize your ink cartridge after an update, it might be due to compatibility issues. Here's how you can resolve it:
Step 1: Uninstall Previous Software
- Use the standard uninstallation process to remove all printer software from your computer.
- Search your computer for any remaining printer files or folders and delete them.
Step 2: Reinstall the Firmware
- Use the original installation disc or download the printer software from the manufacturer's website to reinstall the firmware. Make sure to download the correct firmware for your printer model.
- Connect the printer to your computer via USB and skip Wi-Fi setup for now if prompted.
Step 3: Run Firmware Update
- Open the firmware updater program then follow the instructions on the screen to start updating the firmware. Don't stop the update, even if the lights on the printer are flashing.
- After the update is finished, follow any additional on-screen instructions provided by the firmware updater.
- If the printer restarts automatically, wait for it to complete the restart process.
Step 4: Disable Printer Updates
- Disable future firmware update prompts on the printer settings menu if desired.
- You can also disable automatic firmware updates on your computer if applicable.
Step 5: Print a Test Page
- Print a test page to make sure the printer now recognizes the ink and is working correctly after the firmware update.
If you are still wondering, "Why is my ink cartridge not working?" try using different ink cartridges to test if the problem is with the cartridge or the printer. Sometimes there can be hidden electrical damage. Install a new cartridge to see if it works, and if changing the cartridges doesn't fix the problem, you might need to replace them all. If the issue persists, it's best to contact a technician for help.
Ink Cartridge Cannot Be Recognized Issues: Tips To Avoid In The Future
Dealing with issues such as ink cartridge cannot be recognized can disrupt your printing tasks especially when you're on a tight deadline. To prevent encountering this issue in the future, consider following these tips for smooth printing and trouble-free cartridge recognition.
1. Store Cartridges Properly
To maintain their integrity, keep your ink cartridges in a clean, cool, and dry place. Exposure to excessive heat or moisture can damage the cartridges and lead to recognition issues when installed in the printer.
2. Check for Leakage
Regularly inspect both your printer and cartridges for any signs of leakage. Ink spills or leaks can occur for various reasons, such as a damaged cartridge or improper installation. Promptly addressing any leaks can prevent them from affecting printer functionality and causing recognition problems.
3. Regular Printer Maintenance
Perform regular maintenance on your printer, including cleaning the contacts and printhead, to ensure proper functioning and prevent issues with ink recognition. Also, regular dusting, especially around the cartridge area and contacts, can help maintain optimal performance.
4. Avoid Firmware Updates Unless Necessary
Consider avoiding firmware updates for your printer unless absolutely necessary to prevent new printer cartridge not working issues. While updates may offer new features or improvements, they can also introduce compatibility issues with third-party ink cartridges. If your printer is functioning well, disabling the automatic update feature can help prevent potential recognition problems associated with firmware updates.
Parting Words
There you have it! You can now easily troubleshoot ink cartridge not recognized issues. Just follow the tips in this guide and you won't have to wonder, "Why is my ink cartridge not working?" Also, make sure to take good care of your printer and ink to avoid problems in the future. Happy printing!
Key takeaways:
- Sometimes, the printer doesn't recognize the ink cartridge. This can happen if the printer gets updated, you use the wrong cartridge, or the contacts are dirty.
- When the printer can't recognize the cartridge, it shows messages like "Low ink" or "Cartridge Problem". These messages tell you something's wrong with the cartridge. To fix the problem, try putting back the old cartridge, cleaning the contacts, or reinstalling the printer's software. These steps can help solve the issue. Follow the guide above to learn how to do this easily.
Need help with ink orders or have questions? Reach out to our friendly team at 1-833-465-6888, toll-free. Our dedicated support team is available Monday to Friday, from 6:30am-3:30pm PT. Count on us to make your printing experience smooth and enjoyable!
Frequently Asked Questions
A firmware update is one of the reasons for your Canon printer ink cartridge not recognized problem. The update can fix bugs and minor issues, but it can also be a source of printing troubles. This part will teach you how to disable Canon cartridge protection so your printer can recognize the new cartridge. Here are the steps:
- Step 1: In your Control Panel, click Devices and Printers.
- Step 2: Locate your Canon printer model, then right-click on it.
- Step 3: Choose Printer Properties, then click Software.
- Step 4: Uncheck the Automatically Update option.
If you're still experiencing the Canon ink cartridge not being recognized, try holding down the Stop/Cancel button for 15 seconds. It's a circle with a triangle inside. When your ink monitor shuts off, and the printer stops blinking and starts printing, it means the method is effective.
If your Epson cannot recognize ink cartridge, there could be a few reasons behind this. Maybe the tape on the cartridge wasn't removed, it was installed incorrectly, or there was a firmware update. But don't worry! We've got a guide to help you override the Epson ink cartridge not recognized error. Just follow the steps, and you'll be printing again soon!
For HP printer users, downgrading your HP printer firmware or disabling the update can help in making your printer recognize your new cartridges. You can also try these troubleshooting steps for your HP printer not recognizing the new ink cartridge. Check first if your machine is offline or online, then follow the steps below:
A. Offline HP Printer
- Step 1: Open the Printer menu, then choose Printer Settings.
- Step 2: Locate the Disable HP Cartridge Protection option.
- Step 3: Choose Disable from the menu. Select Apply and Save.
B. Online HP Printer
- Step 1: Find the IP address of your HP printer by clicking Printer Settings, then Network Setup.
- Step 2: Copy the printer's IP address, then type it in your web browser.
- Step 3: The Embedded Web server opens. Click Settings and then HP Cartridge Protection.
- Step 4: Choose Disable HP Cartridge Protection. Click Apply or Save.
If your Brother printer still can't detect ink, there's another simple and easy tip you can try. This method works for both Brother laser and inkjet printers. Just follow these steps to clear the error message and start printing again.
- Step 1:
- For laser printers: Press the power button on your Brother printer seven times.
- For inkjet printers: Hold the Cancel and Print buttons simultaneously.
- Step 2: Lift the printer cover.
- Step 3: Click the Clear or Back button.
- Step 4: Using the arrow keys, scroll to the Reset options.
- Step 5: Select a cartridge to reset.
- Step 6: To reset, click OK, then press 1.
- Step 7: To exit from the menu, press the Clear or Back button.