
Can a firmware update affect a printer? Yes, it can! Printer companies like Epson release firmware updates to fix bugs and improve performance. However, these updates can also make it harder to use third-party or remanufactured ink cartridges. So, how to override Epson ink cartridge not recognized after firmware update?
Don't worry! In this guide, we'll show you step-by-step on how old Epson firmware download can be done. If your ink cartridges stop working after a firmware update, you can still downgrade the firmware so you can use your third-party ink again!
In this guide, we will discuss:
- How to Override Epson Printer Ink Cartridge Not Recognized After Firmware Update?
- Old Epson Firmware Download Guide: Steps For Expression And WorkForce Series Printer
- Epson Printer Firmware Hack: How To Avoid Auto Firmware Updates In The Future
- How To Reset Epson Printer?
How to Override Epson Printer Ink Cartridge Not Recognized After Firmware Update?
Did you know that printer manufacturers can automatically update your printer's firmware without your knowledge? If the update feature is not turned off, they can update your printer automatically, especially if it's connected to Wi-Fi or directly to your computer with an internet connection.
Your printer has probably been updated if it shows errors like the ones listed below:
- Cartridge is missing or damaged.
- Remove and reinstall ink cartridge.
- Cartridge not being recognized.
So, how to fix an Epson ink cartridge not recognized after firmware update?
If your Epson ink cartridge is not recognized after the firmware update or prompted with any of the error messages mentioned above, then you might be one of those affected by the firmware update. But you can still have your printer accept remanufactured ink cartridges by performing an Epson printer firmware reset or downgrade.
Old Epson Firmware Download Guide: Steps For Expression And WorkForce Series Printer
Now, let's go through the steps to download and install the old Epson firmware. This will allow you to continue using your third-party ink cartridges without any issues. Here's how to do it for Epson Expression and WorkForce series:
For Epson Expression Printers (Using Epson T288 Cartridges)
The following instructions will work on the printer models listed in step #2 below.
Step 1: Turn off the printer
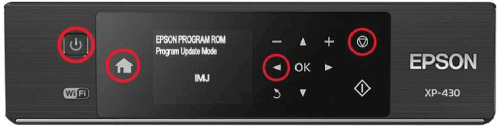
A. For Epson XP-330, Epson XP-430 and Epson XP-434
While the printer is off, press and hold the home, power, left arrow, and cancel buttons simultaneously until the ROM menu appears on the printer's display.
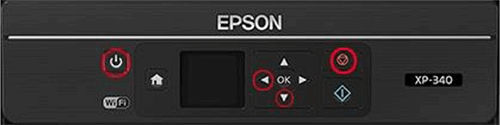
B. For Epson XP-340, Epson XP-440 and Epson XP-446
While the printer is off, press and hold the power, down arrow, left arrow, and cancel buttons at the same time, until your ROM menu appears on the printer's display.
Step 2: Download and run the older version of the firmware installation package on your computer.
Visit Drivers Collection and use their search function to find the firmware that you need. Input your printer 'Downgrade to Firmware version' as your keyword. Find and download the right version for your operating system (Mac or Windows).
| Printer Model Name | Latest Firmware Version | Downgrade to Firmware Version |
|---|---|---|
| Expression Home XP-330 | SO20J8 | JO10G3 |
| Expression Home XP-430 | SO20J8 | MO10G3 |
| Expression Home XP-434 | SO20J8 | MO10G3 |
| Expression Home XP-340 | SO20J8 | MJ05IA |
| Expression Home XP-440 | SO20J8 | SO05IA |
| Expression Home XP-446 | SO20J8 | SO05IA |
| Expression Premium XP-640 | NK11J1-USA (Release 2019.2) |
NK08I5 |
| Expression Premium XP-630 | NQ17J1 (Release 2019.2) |
NQ18G3 |
| Expression Premium XP-830 | NP17Q1 (Release 2019.2) |
NP18G3/NP14G6 |
| Expression Premium XP-530 | NR17Q1 (Release 2019.2) |
NR17J1 |
Step 3: Click on the 'Next' button to start the installation.
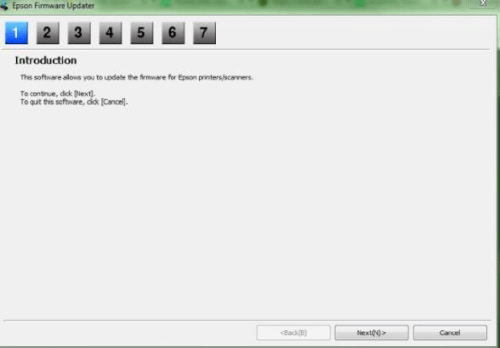
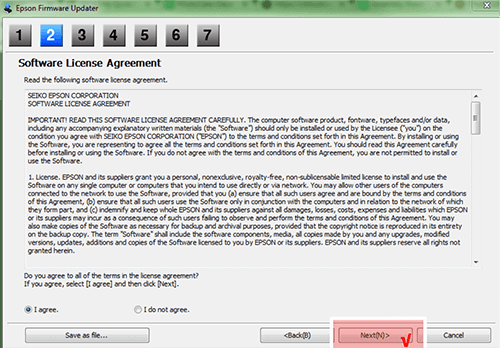
Step 4: Agree to the terms and click on the 'Next' button to continue.
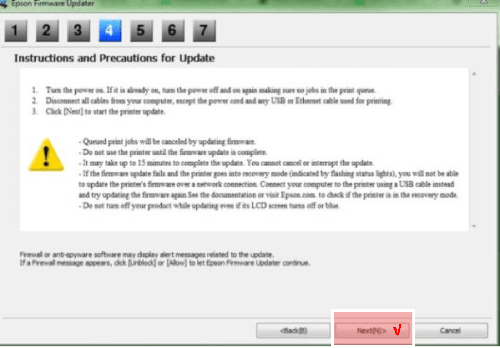
Step 5: Click 'Next' to continue.
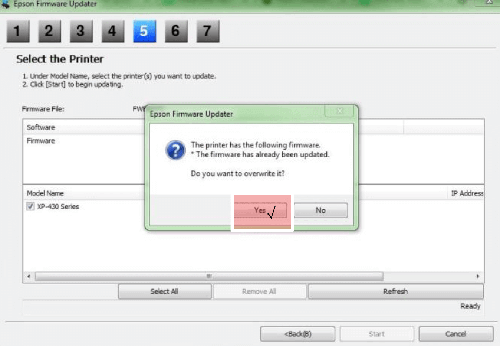
Step 6: Click 'Yes' to overwrite the updated firmware.
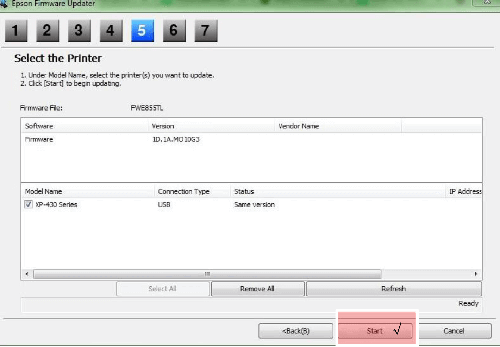
Step 7: Click 'Start' to begin the installation.
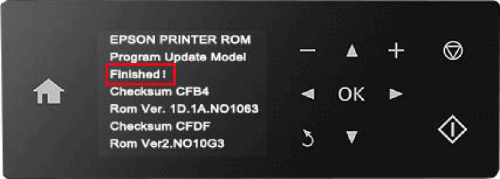
Step 8: Check on your printer and wait until the word "Finished!" appears on the display.
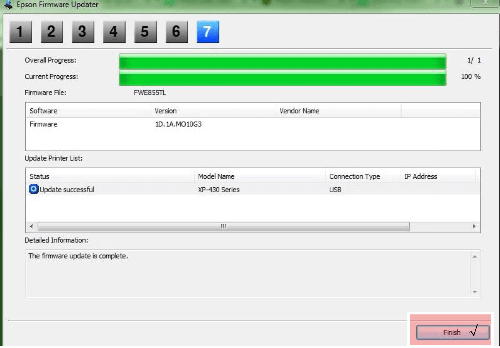
Step 9: Go back to your computer, and click the 'Finish' button on the installer to complete the installation.
Step 10: Disconnect the power cable from the back of the printer, and then reconnect.
Step 11: Finally, turn your printer back on.
At this point, the error message 'Wrong ink tanks' might still appear on your printer screen. To clear this message, you will need to remove all the cartridges and then reinstall them. After that, you should be able to start printing with your compatible Epson 288 (T288) ink cartridges again.
For Epson WorkForce Pro Printers (Using Epson 822 Ink Cartridges)
If you have Epson Workforce Pro printers like WF-4820, here's how to override Epson ink cartridge not recognized after firmware update:
Step 1: Connect the printer to your computer using a USB printer cable.
Step 2: Put the printer into recovery mode
On the new Workforce printers, you'll notice that the only physical button is the power button (see the picture above). To set the printer to recovery mode, follow these steps:
- Turn off the printer by pressing the power button on the front.
- Place three fingers over the top right corner of the touchscreen, covering as much of the area as possible, including the "?" button.
- While holding your fingers on the touchscreen, press the power button.
- When the white power button light turns on, release the power button and lift your fingers from the touchscreen. You may need to repeat these steps several times to get to the black recovery screen with white text.
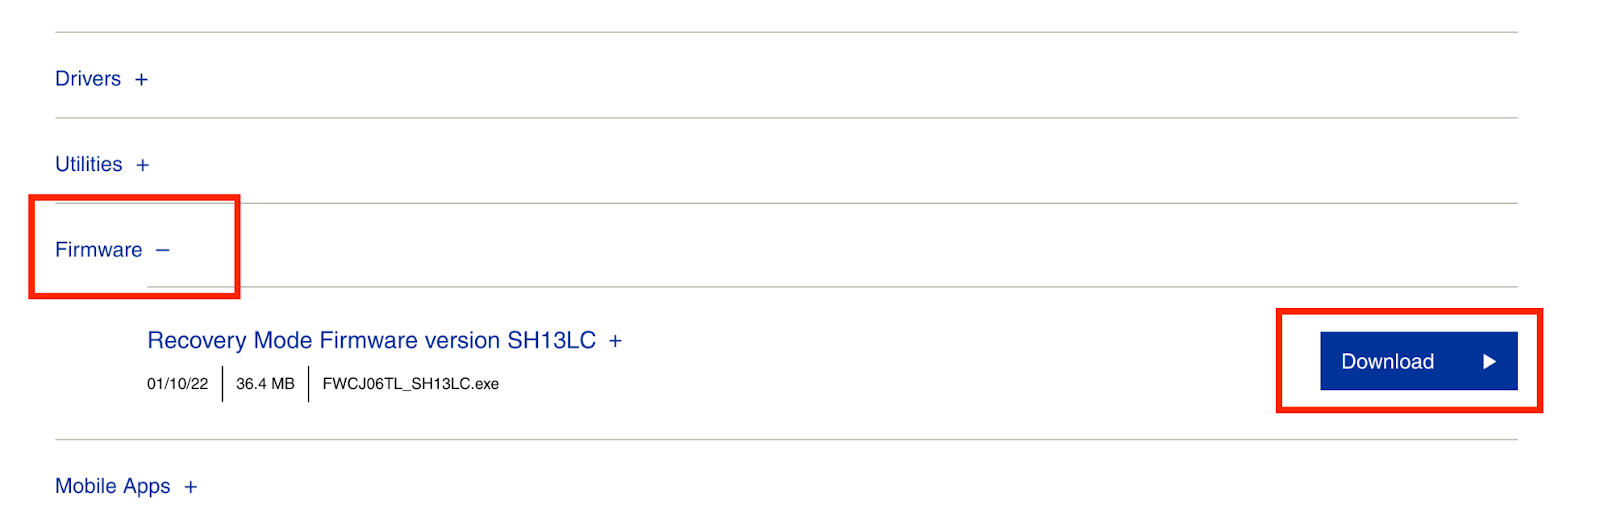
Step 3: Download an old firmware file that ends with '.EXE'.
For example, we use the Epson WorkForce Pro WF-4820. To do this:
- Search your printer model on Epson's official website. Click your printer's name.
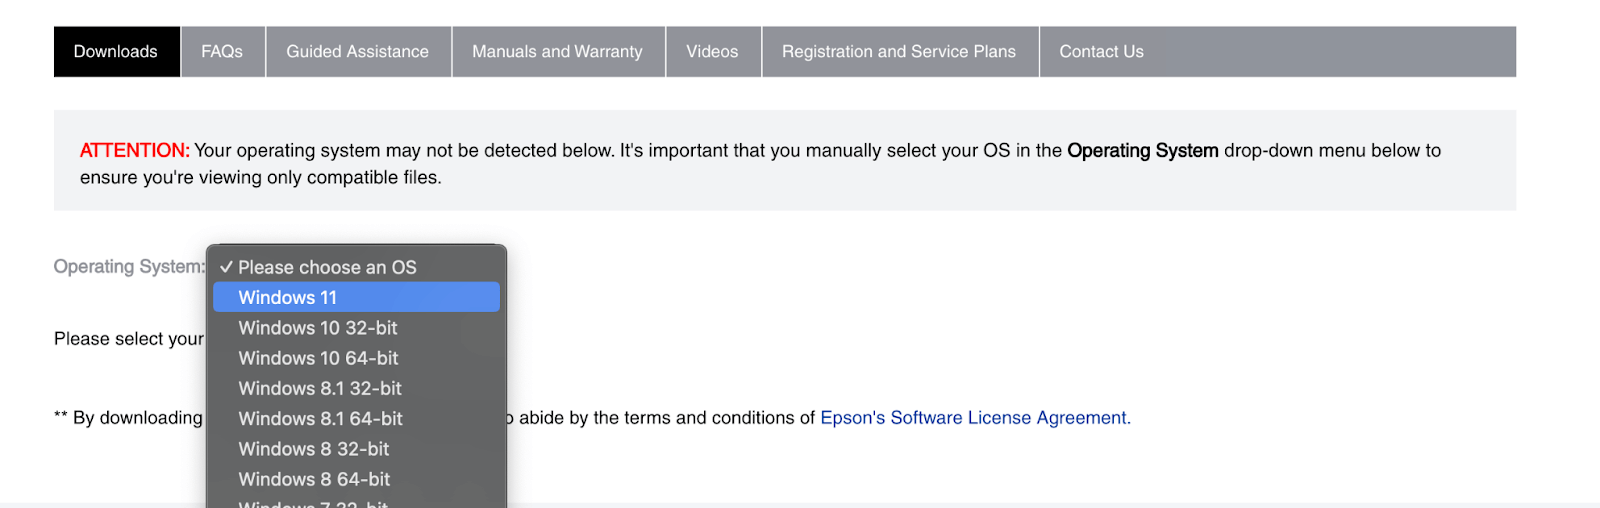
- Next, scroll down to downloads, then select the operating system you are using.
- Select "Firmware", then click "Download".
Step 4: Once the .EXE file has been downloaded, you can install it while the printer is in "recovery mode" and connected to the computer with a USB cable.
Step 5: After running the firmware software, your printer might appear inactive for about 15 minutes. Just let it sit quietly.
Eventually, you'll see the screen on the printer indicating that the 'Program Update Mode' is finished. At this point, all the lights will flash on and off together.
Step 6: Now, you can disconnect your printer from the wall outlet and plug it back in.
The old Epson firmware download is done. You can now use your third-party ink cartridges without any problems.
Epson Printer Firmware Hack: How To Avoid Auto Firmware Updates In The Future
If you are currently using or planning to use remanufactured inks, we strongly advise you to 'NOT' update your printer's firmware to the latest version. Once your firmware has been updated, your printer will only accept OEM or original ink cartridges.
We highly suggest you check and read carefully any message that pops up on your computer or printer screen and not accept it if prompted for a firmware update. It will also be best to disable the auto-update feature found on your printer settings.
How To Disable Epson Firmware Update (For Printers Using Epson 288, 410, and 702 Cartridges)
The following instructions work for Epson Expression XP on the Windows operating system.
Option 1 - Disable Epson Firmware Update Settings from Epson Software Updater
- Step 1: Use the Windows search bar to search and open the 'Epson Software Updater' program.
- Step 2: Select your printer model from the list, if necessary.
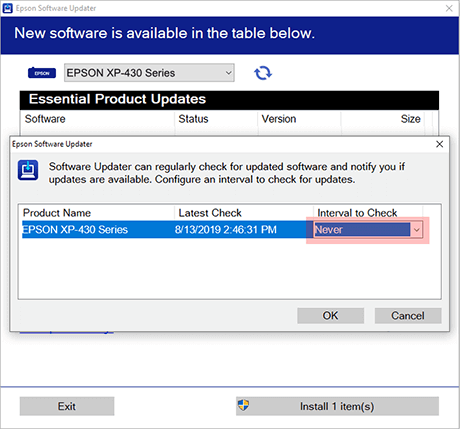
- Step 3: Click on the 'Auto-update settings' link.
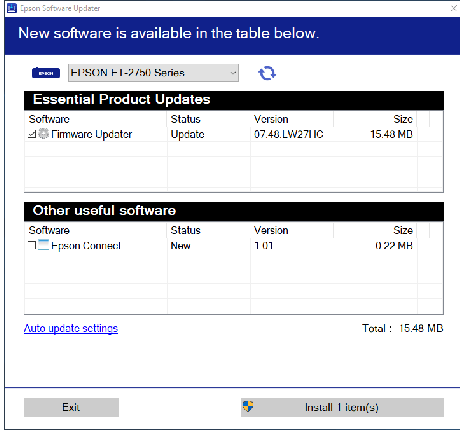
- Step 4: Select 'Never' from the drop-down menu on the 'Interval to Check' column to turn off or disable the automatic Epson firmware updater.
- Step 5: Click 'OK' and then 'Exit' button to save your new settings.
Option 2 - Disable Epson Firmware Update Settings from Windows Taskbar
- Step 1: Right-click on the Epson printer icon on your Windows Taskbar.

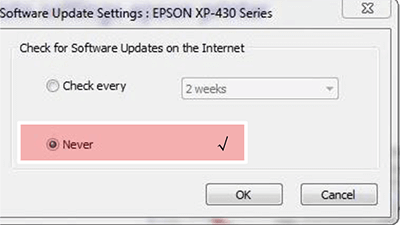
- Step 2: Select the 'Software Update Settings' from the list.
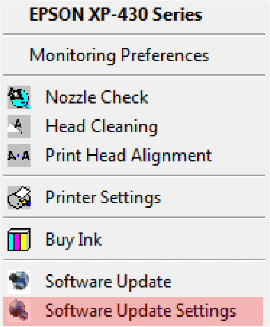
- Step 3: Select the 'Never' option and then 'OK' to save the setting.
How To Reset Epson Printer?
If all else fails after trying to downgrade your printer's firmware and still won't recognize the ink cartridges, you can try resetting the printer itself. Here's how you can do it:
- Step 1: Make sure your Epson printer is turned on.
- Step 2: Find the buttons or screen on your printer.
- Step 3: Look for settings or maintenance options.
- Step 4: Search for the option to reset your printer, then click it.
- Step 5: Switch off your printer, then turn it back on.
- Step 6: Follow any instructions to set up your printer again.
- Step 7: Print a test page to check if your printer works properly after the reset.
Parting Words
How to override Epson ink cartridge not recognized after firmware update? Well, you have the answers in this guide. We hope that the steps above helped you with the old Epson firmware download to undo any firmware updates. Now you can use your third-party ink again without any hassle!
Key takeaways:
- Be cautious when updating your Epson printer's firmware, especially if you use remanufactured inks. The update may restrict the use of third-party ink cartridges.
- If your printer displays errors like "Cartridge is missing or damaged" after a firmware update, you may need to perform a firmware reset or downgrade to allow the use of third-party cartridges again. Follow the specific steps provided for your printer model to download and install the old Epson firmware.
- To avoid future firmware updates that may restrict third-party cartridge usage, consider disabling the auto-update feature in your printer settings or through Epson Software Updater.
Need help ordering cheap ink cartridges? CompAndSave's Customer Service department is ready to help. Call our toll-free number, 1-833-465-6888, from Monday through Friday, 6:30am-3:30pm PT. Happy printing!
Frequently Asked Questions
No, you might not be able to use third-party ink cartridges after updating your Epson printer's firmware. To use them again, you might need to revert to an older version of Epson firmware. To do this, you can follow the steps above for Epson Expression and WorkForce printer series.
To find the correct old firmware version for your Epson printer model, visit the official Epson website. Once there, navigate to the "Downloads" section. You can either search for your printer model directly using the search bar or browse through the list of available products. In the "Downloads" section, look for the category labeled "Firmware". Select this category to view the available firmware downloads. Choose the firmware version that matches your printer model and operating system (Windows or Mac). Finally, click on the download link to save the firmware file to your computer. You can also check the guide above on how to do Epson old firmware download.
You can tell if your Epson printer's firmware has been updated if you encounter errors like:
- "Cartridge is missing or damaged".
- "Remove and reinstall ink cartridge".
- "Cartridge not being recognized".
If you experience these Epson firmware update problems, you may need to downgrade your printer's firmware to use your third-party ink cartridges again.