
Struggling with laser toner cartridge problems? You're in luck! In this article, we'll equip you with solutions and easy-to-follow instructions to conquer those pesky toner cartridge issues. Let's jump right in!
Our guide tackles the most common printer toner problems and covers the following topics:
- Toner Not Recognized/Non-OEM Error Message
- Printer Door Open Error Status
- My Toner Won't Fit
- Low Toner/Toner Life End/Replace Toner Error
- Laser Printer Poor Print Quality
- Printer Printing Wrong Colors
- Print Color Not Matching the Screen Color
- Leaking Toner Cartridge
- Squeaky or Grinding Noises from Printer
For ink cartridges, check our guide on how to troubleshoot common ink cartridge problems.
Laser Printer Toner Problems: Troubleshooting Tips
To begin, it's essential to determine whether your printer has integrated drums and toners or separate ones. Certain printer brands like HP and Lexmark have integrated drums and toners, while others like Brother have separate components. Knowing this key distinction will help you diagnose and resolve laser printer toner problems more effectively.
1. Toner Not Recognized/Non-OEM Error Message
Below are some of the common causes of non-recognition toner cartridge problems.
Did Not Remove the Tape on the Toner Cartridge
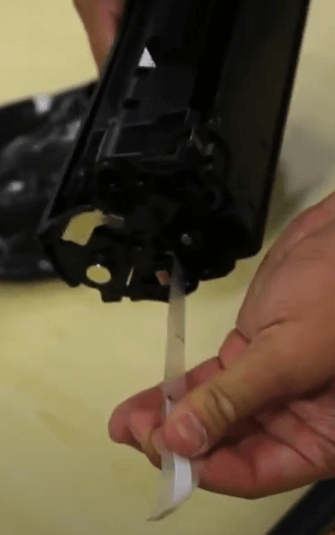
One of the common causes of this issue is forgetting to remove the tape on the toner cartridge. After unpacking a new toner cartridge, make sure to remove any protective coverings, plastic strips, or tabs attached to it. Failure to remove them may cause the cartridge to not work properly. Check out our how-to-install ink and toner cartridges video for more information.
Wrong Toner Cartridge Model
To ensure proper functioning of your printer, it's crucial to install the correct toner cartridge model. Even if a toner cartridge appears similar in shape and size to the one you need, your printer will only accept the specific model designed for it. Follow these steps to find the right toner cartridge for your printer:
- Option 1. Look for the cartridge model number.
You can find the model number on the top or front of your empty laser toner cartridge. The model number consists of a combination of numbers and letters, such as TN227, for example. - Option 2. Check your printer manual.
You can find your printer model in the manual, as well as the toner model it is compatible with. - Option 3. Check your printer manufacturer's website.
If you're unsure which toner cartridge to use, enter your printer model on the manufacturer's website. This will show you a list of compatible toner cartridges. - Option 4. Ask your printer manufacturer's support team for assistance.
If you're still unsure, don't hesitate to reach out to the manufacturer's support team for help.
If you're unsure which toner to use, check out our tips on finding the correct toner for your printer.
Toner Not Installed Properly
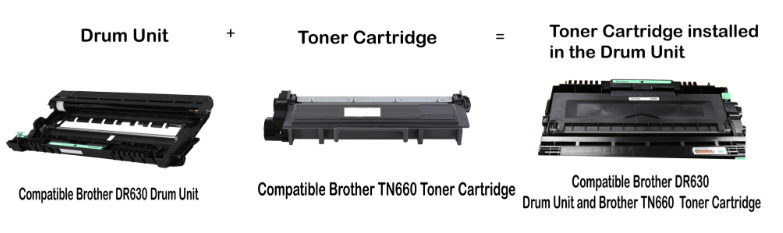
Non-recognition errors can occur if the toner is not installed correctly. As mentioned earlier, there are two main types of laser toner cartridges: those integrated with the drum unit and those that are separate. It's important to be aware of this distinction because the installation process varies between them.
For more information, you can check out our how-to-install ink and toner cartridges video. Alternatively, you can follow the steps below, which are generally applicable to most laser printer models.
Toner Integrated to Drum
- Step 1.
Gently remove the toner cartridge from the printer while wearing rubber gloves, taking care not to touch the sensitive components. It's a good practice to place the cartridge assembly on a disposable piece of paper to avoid any potential toner spills. - Step 2.
Next, realign the new toner cartridge with the tracks inside the printer and gently push it until it clicks into place. If toner gets on your clothing, wipe it off or wash it with cold water immediately.
Toner Not Integrated to Drum
- Step 1.
Wearing rubber gloves, remove the drum unit and toner cartridge assembly from the machine. Putting the assembly on a disposable piece of paper is a good idea in case you spill any toner. - Step 2.
Next, take the toner cartridge out of the drum unit and carefully reinstall it back into the drum. Make sure it's firmly in place and locked into position. If you get toner on your clothing, wipe it off or wash it with cold water immediately. - Step 3.
Finally, align the drum unit and toner cartridge assembly with the tracks in the printer and slide it in until it clicks into place.
Wrong Toner Cartridge Model
To ensure proper functioning of your printer, it's crucial to install the correct toner cartridge model. Even if a toner cartridge appears similar in shape and size to the one you need, your printer will only accept the specific model designed for it. Follow these steps to find the right toner cartridge for your printer:
- Option 1. Look for the cartridge model number.
You can find the model number on the top or front of your empty laser toner cartridge. The model number consists of a combination of numbers and letters, such as TN227, for example. - Option 2. Check your printer manual.
You can find your printer model in the manual, as well as the toner model it is compatible with. - Option 3. Check your printer manufacturer's website.
If you're unsure which toner cartridge to use, enter your printer model on the manufacturer's website. This will show you a list of compatible toner cartridges. - Option 4. Ask your printer manufacturer's support team for assistance.
If you're still unsure, don't hesitate to reach out to the manufacturer's support team for help.
If you're unsure which toner to use, check out our tips on finding the correct toner for your printer.
Toner Installed in the Wrong Color Slot
This is common for a laser printer that uses multiple toners.
- If you have the right toner for your printer, check if it is installed in its correct color slot. Each cartridge should be labeled with the color it represents.
- If it is installed in the correct color slot, turn the printer off and back on to reset the system.
For installation instructions, check our how-to-install ink and toner cartridges video for more information.
Dirty Toner or Printer
Proper maintenance of the toner cartridge and printer, including cleaning them, is essential for ensuring the longevity and optimal performance of your toner and printer. Failure to maintain them may result in them becoming dirty, damaged, or clogged, which could interfere with the printer's ability to recognize toner.
- Step 1.
Prepare rubber gloves, mask, toner vacuum (not regular vacuum), activated toner cloth, isopropyl alcohol, cotton swabs, and paintbrush. - Step 2.
Let your printer cool down prior to cleaning for an hour before cleaning so you don't electrocute yourself. - Step 3.
Wear rubber gloves and a mask before removing the printer's toner cartridge and drum unit. Place them in an area that is away from sunlight. Be careful not to touch the surface of the drum unit to avoid damaging it. - Step 4.
Wipe your toner cartridge(s) using an activated toner cloth. As you wipe, place the toner cartridge on a second activated toner cloth to remove any excess toner. This helps to clean the cartridge and prevent any leftover toner from getting onto other surfaces. - Step 5.
Place the toner vacuum inside the printer chassis and use it to slowly remove any spilled toner from the internal components. Be sure to avoid touching any internal surfaces inside the printer with the vacuum. - Step 6.
Use a paintbrush to clean any hard-to-reach spots, including any narrow and deep openings or cracks in the printer where toner powder may have accumulated. Use the toner vacuum to get rid of any dust or debris that was left behind after removing all of the toner from these crevices. - Step 7.
Next, dip a cotton swab in Isopropyl alcohol and gently rub the corona wires with it. Make sure to clean both sides of the wires and change the cotton swab when necessary. Be careful not to apply any pressure since the wires are fragile and expensive. - Step 8.
Clean the paper feed roller after cleaning the corona wires. Using a cotton swab dipped in Isopropyl alcohol, clean the paper feed roller by rubbing it in a circular motion to eliminate any toner build-up. Remember to replace the cotton swab when necessary. - Step 9.
Reinstall all the parts you removed, including the toner cartridge and drum unit, and close the printer but don't turn it on yet. - Step 10.
Clean and disinfect the outside of your laser printer. Use an activated toner cloth and Isopropyl alcohol to remove any dust and debris that has accumulated on the exterior surface of your printer. - Step 11.
Turn on your printer and check if your laser printer recognizes the toner this time.
Laser Printer Regional Coding
If you purchased your printer in Region A and tried to install toner cartridges purchased in Region B, your printer will not accept them due to region coding enforcement. This applies to some printers, regardless of whether you are using original or remanufactured cartridges.
Before following the steps below, it's important to determine if your printer has region coding. To do this, simply search for your printer model and the term "region coding" on Google. For example, you can search for "HP DeskJet 2700 region coding."
If the results show that your printer does not have region coding, you can check the other reasons why you're experiencing non-recognition problems. If your printer does have region coding, you have several options:
- Option 1:
You can choose to continue purchasing cartridges from your previous region, but keep in mind that this can be costly due to shipping and additional fees. - Option 2:
You can try swapping the cartridge part with the chip on it. However, this should only be attempted with caution and at your own risk. There are YouTube tutorials available to guide you through the process. - Option 3:
Reach out to your printer manufacturer and inquire about the possibility of changing the region code of your printer. It's important to note that the initial support staff may not be familiar with this option. In such cases, politely request to speak with a supervisor or manager who can provide further guidance on resolving the issue. Please be aware that printer manufacturer support may not extend assistance if you are using third-party cartridges. - Option 4:
If you want to minimize any potential risks, it may be worth considering purchasing a new printer that is specifically designed for the region you have relocated to. Look for a printer that offers features such as the ability to disable cartridge protection, no region lock, and the option to turn off automatic firmware updates. These features will provide you with the flexibility to use cartridges from different manufacturers and give you greater control over the printer's software.
Printer Firmware Problem
If you are using third-party toner cartridges, check your printer's firmware to see if it has been updated. Printer manufacturers like HP and Epson release firmware updates not just to fix bugs but also to restrict the use of third-party toner cartridges. If this is the case, you may need to downgrade your printer's firmware version to continue using remanufactured toner cartridges. You can follow our downgrade instructions for HP and old firmware download steps for Epson.
Other Possible Reasons
Printer manufacturers have implemented measures to limit the use of third-party ink or toner cartridges, apart from firmware updates. HP's HP+ program is an example of such measures. When you activate HP+ on a compatible printer, it will only work with genuine HP cartridges throughout its lifespan. For more information, you can read our article on the HP+ program.
2. Printer Door Open Error Status
When the cartridge door is not fully closed, an error message will be displayed. To resolve this, open the cartridge door and then securely close it against the body of the printer. If this doesn't work, we have listed the other reasons below:
Obstructions
Check if there are any obstructions or debris inside the toner cartridge slot that may be preventing the cartridges from seating properly. If you find any debris, remove it carefully. If you don't see any debris, but notice dirt or dust inside the slot, clean it by following the 'Dirty Toner or Printer' steps under Toner Not Recognized Error.
Toner Not Fully Seated.
Another possible reason for this laser printer toner problem might be that one or more toner cartridges are not sitting correctly. In most cases, the black cartridge lock on the left side of the printer may be broken, causing the black toner cartridge to stick out on the left side and preventing the door from closing.
To know if this is really the case, you can remove all the toner cartridges and try to close the printer door. If it closes, it means that the toner(s) is not fully seated. Follow the steps below to fix this:
Solution:
- Step 1.
Remove all toners. - Step 2.
Install one toner at a time, starting at the bottom and working your way back, closing the door each time a cartridge is installed. - Step 3.
If the black toner won't close, look on the left side and find a beige, black, etc, piece hanging down where the toner slides in. - Step 4.
Use a small piece of cardboard to move the piece up and out of the way, and then use the cardboard as a shim to hold the piece up while inserting the toner.
Tab in the Printer
If the previous solution does not work, it is possible that a printer tab may be preventing the door from closing properly.
Solution:
- Step 1.
Check for a tab in the printer hanging down. Sometimes it is white in color and located in the upper left corner. This varies depending on your printer's brand and model. - Step 2.
Once found, push the tab up to snap everything in place. The door should now close completely.
3. My Toner Won't Fit
If you're having trouble fitting your cartridge into your printer, below are the reason and solutions to fix the issue.
Wrong Toner Cartridge
Ensure to use the correct toner cartridge for your printer, as not all cartridges that look the same will work. If you're not sure which toner to use, check out our tips on how to find the correct toner for your printer.
Here are some steps to help you find the right toner cartridge for your printer:
- Option 1:
Look for the cartridge model number on the top or front of an empty laser toner cartridge. The model number is usually a combination of numbers and letters, such as TN227. - Option 2:
Check your printer manufacturer's website. Enter your printer model on the manufacturer's website, and you'll see a list of compatible toner cartridges. You can find your printer model in the manual. If unsure what your printer model is, you can check our tips on how to find your printer name. - Option 3:
If you're still unsure, reach out to the printer manufacturer's support team for assistance. Don't hesitate to ask for help.
Obstructions or Debris
Make sure there is nothing blocking the toner cartridge slot in your printer that could prevent the cartridges from fitting properly. If you see any debris inside, remove it carefully. If there is no debris, but there is dust or dirt, you can clean it by following the steps under the 'Dirty Toner or Printer' section in the Toner Not Recognized error guide.
Did not Remove Tape or Plastic Coverings
Make sure to remove any protective coverings, plastic strips, or tabs from a new toner cartridge before installing it into your printer. These coverings may prevent the cartridge from fitting properly, so removing them before use is important. Check our how-to-install ink and toner cartridges video for more information.
Installed in Wrong Color Slot
If you have a laser printer that uses multiple toners, it's important to ensure each toner is installed in its correct color slot. This information can usually be found on the cartridge label, which indicates the color it represents. If you have the right toner for your printer, but it doesn't fit, double-check the color slot. For detailed installation instructions, you can also refer to our how-to-install ink and toner cartridges video.
Toner Not Installed Properly
Non-recognition errors may occur if the toner cartridge is not installed properly. Laser toner cartridges come in two main types: those integrated with the drum unit and those not.
If you are unsure how to install the toner cartridge correctly, check our how-to-install ink and toner cartridges video for more information. Alternatively, you can follow the steps provided in the 'Toner Not Installed Properly' section of the 'Toner Not Recognized' error guide.
4. Low Toner/Toner Life End/Replace Toner Error
The steps to fix a laser toner end-of-life error may vary depending on the printer model and manufacturer. Most of the time, simply resetting the printer to its factory default settings and unplugging the printer for 15 minutes do the work. However, if it doesn't work, check the following:
For New Remanufactured Toner Cartridges
- If it's new, double-check that the toner cartridge is the right toner for your laser printer.
- Ensure that you remove any protective coverings, plastic strips, or tabs attached to the toner cartridge before installing it.
- Remove and reinstall the toner cartridge properly and securely into the correct slot.
If you have installed a new remanufactured toner and are still encountering errors, you can try resetting the toner chip using a reset tool. Keep in mind that this may not always work, and some printers may not recognize refilled cartridges even with a reset chip. In such cases, you can try overriding the error message using the following options:
- Option 1:
Press and hold the "Cancel" or "Stop" button on your printer for 10 seconds. This should reset the printer and allow it to recognize the remanufactured toner cartridge. - Option 2:
Access the printer's settings menu and look for an option to disable the "Cartridge Check" or "Toner Check" feature. Disabling this feature will prevent the printer from checking the cartridge's authenticity and may enable you to use the remanufactured toner cartridge without any issues.
For Non-new Remanufactured Toner Cartridges
- Remove the toner cartridge from the printer and assess its weight. If it feels light, it's likely near empty and should be replaced promptly. Printing with an empty toner cartridge can damage your printer and result in poor print quality.
- If the toner cartridge still feels heavy, gently shake it from side to side. This can help redistribute the remaining toner and allow it to be used more effectively.
- Clean the contacts on both the toner cartridge and inside the printer. Dust or debris on these contacts can disrupt communication between the printer and cartridge. Refer to the 'Dirty Toner or Printer' section under the 'Toner Not Recognized' error for detailed instructions on cleaning the contacts.
If none of the above works, we suggest trying to override the error message by following the steps mentioned in 'New Remanufactured Toner Cartridge' section under 'For New Toner Cartridges'.
5. Laser Printer Poor Print Quality
Signs of poor print quality on laser printers include:
- Faded or Light Prints
- Blurred or Smudged Prints
- Black or Colored Lines or Streaks on the Printed Page
- Uneven or Spotty Prints
- Ghosting or Shadowing
To enhance print quality, follow the troubleshooting steps provided below that are most applicable to your specific situation:
Poor Print Quality Due To Toner Cartridge Problems
Low Toner Level
When the toner level is low, the printer may produce faded or light printouts. Ensure that the toner cartridge is not empty and replace it if necessary, as continuing to print with an empty toner cartridge can cause damage to your printer and result in poor print quality. To check if your toner is really running low, you can follow the tips below.
- Step 1.
Remove the toner from the printer and assess its weight. - Step 2.
If it's still heavy, proceed to Step 3. If it feels light, replace the toner cartridge immediately to not damage the printer. - Step 3.
If the toner cartridge is new or has enough toner, wearing rubber gloves, shake it gently sideways up to 6 times to redistribute the toner powder. Once done, install it again.
Dirty Toner and/or Printer Components
Dust or debris on the contacts can cause blurred or smudged prints. For instructions on how to clean it, you can follow the steps in 'Dirty Toner or Printer' under 'Toner Not Recognized' Error.
Toner Buildup Inside The Printer
Take a close look inside the printer, focusing on areas where toner buildup is likely to occur. Pay attention to the toner cartridge cavity, the paper path, and the drum unit. If there's a toner buildup, then it is the reason why you're getting blurred or smudged prints. That said, you also need to clean it. For instructions on how to clean it, you can follow the steps in 'Dirty Toner or Printer' under 'Toner Not Recognized' Error.
Deformed or Damaged Toner Cartridge
Toner cartridges can get deformed or damaged when mishandled, installed incorrectly, or due to some environmental factors like exposure to extreme temperatures, humidity, or direct sunlight. That said, carefully examine the exterior of the toner cartridge for any visible signs of deformation, cracks, or other damage. Pay attention to the drum surface and the connections and contacts on the cartridge. If damaged, replace it before using your printer again.
Poor Print Quality Due To Printer Settings
Toner Save Mode Enabled
Toner save mode is a feature in some printers that reduces the amount of toner used in a print job, which can make prints lighter and less vibrant. This feature is often used to save money on toner, but it can also result in poor print quality.
To disable toner save mode, follow these steps:
For Windows- Open the print dialog box by pressing Ctrl + Pkeys on your keyboard.
- In the Print dialog box, select your printer from the list of available printers.
- Click on the "Properties" or "Preferences" button to open the printer settings.
- Look for an option related to print quality or toner save mode. The exact wording may vary depending on your printer model.
- Uncheck or disable the toner save mode option to turn it off.
- Preview the changes in the print preview section, if available, to see how they will affect the printout.
- Click "OK" or "Print" to start printing without the toner save mode.
- Open the print dialog box by pressing the Command + Pkeys on your keyboard.
- In the Print dialog box, select your printer from the list of available printers.
- Click on the "Copies & Pages" or "Quality & Media" option to open the printer settings.
- Look for an option related to print quality or toner save mode. The exact wording may vary depending on your printer model.
- Uncheck or disable the toner save mode option to turn it off.
- Preview the changes in the print preview section, if available, to see how they will affect the printout.
- Click "Print" to start printing without the toner save mode.
Printer Density Settings Too Low
If you have not enabled toner save mode, then low print density might be the reason. As you may already know, this refers to the level of toner coverage on a page. If the print density is set too low, prints can appear faded or light. To change printer density settings, follow these steps:
For Windows
- Open the print dialog box by pressing Ctrl + Pkeys on your keyboard.
- In the Print dialog box, select your printer from the list of available printers.
- Click on the "Properties" or "Preferences" button to open the printer settings.
- Look for an option related to print quality, density, or print resolution. The exact wording may vary depending on your printer model.
- Adjust the print density or quality settings to a higher value. You may have a slider or dropdown menu to choose from different print quality options.
- Preview the changes in the print preview section, if available, to see how they will affect the printout.
- Click "OK" or "Print" to start printing with the adjusted print density settings.
For Mac
- Open the print dialog box by pressing the Command + Pkeys on your keyboard.
- In the Print dialog box, select your printer from the list of available printers.
- Click on the "Copies & Pages" or "Quality & Media" option to open the printer settings.
- Look for an option related to print quality or toner save mode. The exact wording may vary depending on your printer model.
- Uncheck or disable the toner save mode option to turn it off.
- Preview the changes in the print preview section, if available, to see how they will affect the printout.
- Click "Print" to start printing without the toner save mode.
Printer Settings in Draft Mode
Check your printer settings to see if it is in draft mode. If in draft mode, you can change it to a higher quality mode. Doing this will improve the quality of your print job.
For Windows
- In the Control Panel, select "Devices and Printers" or "Printers and Scanners."
- Choose the printer on the list of installed printers and right-click on it.
- Choose "Printing Preferences" or "Properties" from the drop-down menu.
- Look for an option related to print quality or print.
- If you see a "Draft" or "Fast" print mode option, uncheck or deselect it if enabled.
- Save the changes and exit the printer settings.
For Mac
- Open the "System Preferences" on your Mac from the Apple menu or the Dock.
- Click on "Printers & Scanners" or "Print & Scan" and then, select your printer from the list on the left-hand side.
- Click on the "Options & Supplies" or "Open Print Queue" button.
- Look for a "Print Quality" or "Print Mode" section.
- If there is a "Draft" or "Fast" print mode option, uncheck or deselect it.
- Close the printer settings window to save the changes.
Poor Print Quality Due To Paper Problems
Type of Paper Used
- Incompatible paper.
Only use printer paper that is designed for laser printers. These papers are manufactured to meet the necessary specifications for reliable printing and minimize print issues. Incompatible paper, such as paper designed for a different printing technology (e.g., inkjet paper), may not be suitable for laser printers and can cause issues with print quality. - Low-quality paper.
Low-quality paper may have uneven surfaces or excessive moisture content, leading to poor toner adhesion and potential smudging. Paper Coating. Coated or glossy paper has a smooth, shiny surface that can affect toner adhesion. If the toner is not properly fused to the paper surface, it can lead to smudging or smearing. - Recycled or Heavily Textured Paper.
Recycled paper often has a rougher texture due to its composition, which can cause uneven toner distribution and result in blurred or smudged prints. Heavily textured paper, such as linen or textured cardstock, can also disrupt the smooth toner transfer process and impact print quality.
What to do:
- Choose high-quality, laser-compatible paper.
Look for paper specifically designed for laser printers. - Select the appropriate paper weight.
Different types of documents may require different paper weights. Ensure you're using a paper weight that is suitable for your print job. Thicker papers generally offer better print results and are less prone to smudging.
Paper Jams
Paper jams can disrupt the printing process and result in lines or streaks on the page. Clear any paper jams and remove any debris from the printer to prevent this issue.
Misaligned Paper
Ensure that the paper is loaded correctly in the tray and that it is not skewed or misaligned. If it is, adjust the paper guides to ensure proper alignment.
Poor Print Quality Due To Laser Printer Drum Problems
Worn-out Drum or Fuser
To determine whether it's the drum or fuser that is causing print quality issues in your laser printer, you can follow these steps:
- Step 1.
Start by printing a test page from your printer. Make sure to use a plain white sheet of paper for the test. - Step 2.
Carefully examine the test page for any print quality issues and analyze the print defects. Blurred or smudged prints that are consistent throughout the page are more likely caused by a worn-out drum. On the other hand, if the print defects are mainly concentrated in a particular area of the page, it could indicate a fuser problem.
If you have identified the worn-out component, ensure to replace it before using the printer again.
Scratched or Dirty Drum
Carefully examine the surface of the drum for any visible scratches, marks, or dirt. The drum is a cylindrical component usually positioned near the toner cartridge. It is responsible for transferring the toner onto the paper during printing.
- If dirty, clean it.
Dirt or debris on the drum can also interfere with the smooth transfer of toner and affect print quality. Gently clean it using a lint-free cloth or a soft, dry brush. Be cautious not to apply excessive pressure or touch the drum with your fingers, as it is a sensitive component. - If scratched, replace it.
Scratches on the drum can cause toner to accumulate in those areas, resulting in lines or streaks on the printed page. If you observe visible scratches or marks on the drum surface, it is recommended to replace the drum unit. Scratches cannot be repaired, and a damaged drum can significantly impact print quality.
Other Reasons for Poor Print Quality
Worn-out Wiper Blade
Replacing the worn-out wiper blade can help improve print quality, as it ensures proper cleaning of the drum or imaging unit and prevents toner buildup that can lead to print defects like lines or streaks on the page. To check if it is indeed causing the print quality issue, you can:
- Step 1.
Locate the wiper blade. The wiper blade is usually positioned near the drum or imaging unit. It is a thin, rubber-like strip that moves across the surface of the drum or imaging unit to clean off any excess toner. - Step 2.
Inspect the wiper blade. Carefully examine the wiper blade for signs of wear or damage. Look for any visible cracks, tears, or unevenness in the blade's surface. A worn-out wiper blade may appear frayed or worn down. - Step 3.
Check for toner residue. If the wiper blade is worn out, you may notice an excessive buildup of toner residue around the blade or on the drum or imaging unit. This can indicate that the blade is not effectively cleaning the drum or imaging unit surface.
If you observed significant wear or damage to the wiper blade, or if you have noticed an excessive buildup of toner residue around the blade or on the drum, then it is time to replace it.
Printer Driver Issues
Ensure that you have installed the correct printer driver for your printer and that it is up to date. Outdated or incorrect drivers may affect print quality.
Damaged Transfer Roller
If the transfer roller is damaged, you will need to replace it. The transfer roller is typically located underneath the toner or imaging unit. It is a long, cylindrical roller that comes in direct contact with the paper during the printing process. To check if it's the root cause, follow the following:
- Step 1.
Locate and inspect the transfer roller. Carefully examine the surface of the transfer roller for any visible signs of damage, such as scratches, dents, or worn-out areas. Damage to the transfer roller can disrupt the smooth transfer of toner, leading to lines or streaks on the printed page. - Step 2.
Replace the transfer roller if damaged: If you observe any significant damage or wear on the transfer roller, it is recommended to replace it. Damaged transfer rollers cannot be repaired, and a replacement roller is necessary to restore proper printing functionality.
6. Printer Printing Wrong Colors
If your laser printer is using four colors - black, cyan, magenta, and yellow, eventually, one color may run out before another. For example, if you're printing a forest scene and the leaves appear more yellow than green, your cyan cartridge may need to be replaced.
Cartridge to troubleshoot if:- Trying to print BLUE, but it looks CYAN, then troubleshoot your MAGENTA.
- Trying to print BLUE, but it looks MAGENTA, then troubleshoot your CYAN.
- Trying to print RED, but it looks YELLOW, then troubleshoot your MAGENTA.
- Trying to print RED, but it looks MAGENTA, then troubleshoot your YELLOW.
- Trying to print GREEN, but it looks YELLOW, then troubleshoot your CYAN.
- Trying to print GREEN, but it looks CYAN, then troubleshoot your YELLOW.
Solution:
- Check toner levels.
Make sure that your cartridges have enough toner and that they are correctly installed. If there's little to empty toner, you will need to replace the cartridge. - Check the color settings.
Make sure that your printer's color settings are set to the correct color mode. For example, if you're printing a photo, make sure that the color mode is set to "photo" or "color" rather than "black and white" or "grayscale." - Clean printer and components regularly.
If you've tried other troubleshooting methods and the problem persists, you can clean your printer and other components as a last resort. For instructions on how to clean it, you can follow the steps in 'Dirty Toner or Printer' under 'Toner Not Recognized' Error.
7. Print Color Not Matching the Screen Color
Here's how to fix the issue of print colors not matching the screen colors by calibrating your computer screen. Note that specific options and settings may differ based on your printer and operating system. Below are the general steps:
Calibrate with a tool.
You can calibrate your computer screen using an advanced calibration tool like a colorimeter or spectrophotometer. Note that using a calibration tool will help you achieve the same level of accuracy as professional calibration tools.
Calibrate without a tool.
If you choose to calibrate without a tool, you can use the built-in calibration tools on your computer's operating system.
For Windows PC:
Windows Search > search for 'display calibration' > Calibrate display color. (Adjust the brightness, contrast, and color settings as directed on the screen until the colors appear true to color.)
For Mac:
System Settings > Displays > Color > "Calibrate". (Using the toner vacuum, take out any remaining dust or debris after removing all of the toner from these gaps.)
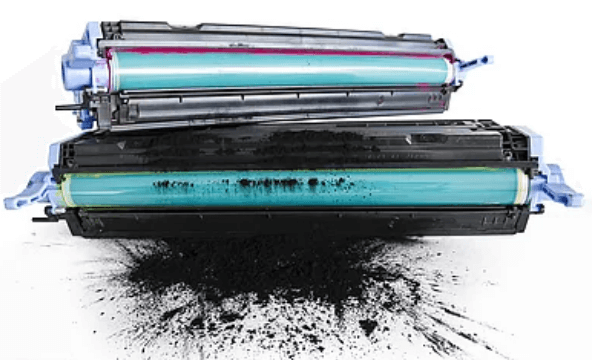
8. Leaking Toner Cartridge
To handle toner leaks properly, take the following precautions:
- Use toner vacuum only. Avoid using regular vacuums in vacuuming spilled toner powder as it can create a static charge and potentially shock you.
- Wear a non-surgical face mask to avoid inhaling toner powder.
- Put on rubber gloves to prevent skin irritation.
To clean the printer, follow the steps below:
- Unplug the laser printer and let it cool for an hour before cleaning to prevent burns from hot printer parts.
- Carefully uninstall the toner cartridge and dispose of it in a sealable plastic bag.
- Use sturdy, flat-edged cardboard to scrape the toner out of the printer, storing it in the same sealable plastic bag.
- Wipe away the remaining toner powder inside the printer using a dry lint-free cloth or paper towel. Avoid dampening the cloth or paper towel, as damp wipes can cause toner powder to stick to printer components and damage them during operation. For additional instructions on how to clean laser printer, you can follow the steps in 'Dirty Toner or Printer' under 'Toner Not Recognized' Error.
- Use a broom and dustpan, if necessary, to sweep any remaining toner powder on the floor.
9. Squeaky or Grinding Noises from Printer
Unusual sounds from the printer often occur due to the moving and rotating parts such as the toner cartridge, imaging drum, fuser unit, and printer gears. Below are the main causes of unusual sounds in the printer, along with steps to locate and troubleshoot them:
1. Toner Cartridge Problems
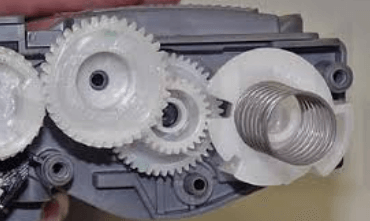
To troubleshoot the issue, start by replacing the toner cartridge. If the problem is resolved after changing the cartridge, it suggests that the toner itself was causing the sound.
To address this issue, find the gears of the toner cartridge in the provided photo. Apply a small amount of specialized grease for mechanical parts using a Q-tip to lubricate the gears. Once lubricated, reinstall the previous toner cartridge. If the problem persists even after lubrication, please refer to the other potential causes of the noise mentioned below.
2. Cartridge Drum Problems
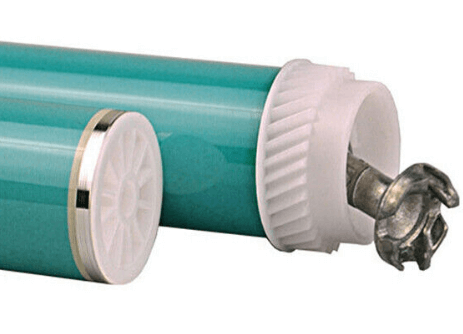
Drum Axle or Drum Pin
The drum gears rotate against the drum axle or pin. Over time, the plastic material of the drum gear can wear out. To address this, apply a small amount of specialized grease for mechanical parts to lubricate the drum pin using a Q-tip. Additionally, lubricate the inside of the drum gears while being cautious not to damage the drum itself. It is important not to use excessive lubricant as it may drip onto the printed page and cause smudging or other issues.
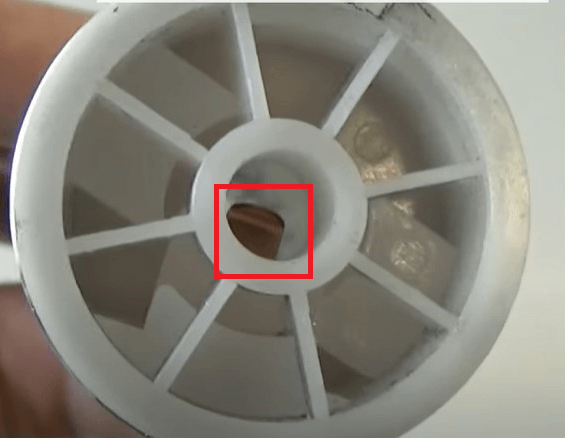
Copper Contact in Drum
Inside the drum, there is a copper contact that serves as an electrical connection. To ensure proper functionality, lubricate this copper contact with a small amount of conductive grease specifically designed for electrical contacts using a Q-tip. It's important to avoid using regular grease as it may interfere with the electrical conductivity. Take care not to bend or damage the electrical contact while applying the conductive grease.
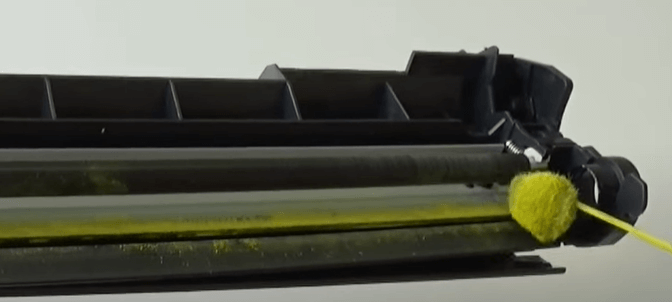
OPC Drum and Wiper Blade Contact Point
If you hear a strange banging noise from your laser printer, lubricate the contact areas between the wiper blade and the OPC drum to reduce friction. Smooth movement of the wiper blade is crucial for cleaning off remaining toner. Insufficient movement can damage the blade and drum, causing the noise. To prevent this, use a specialized drum lubricant like zinc stearate. Dampen a lint-free cloth (or applicator specifically designed for lubrication purposes) with a small amount of the lubricant and gently apply it to the contact areas. This will reduce friction and resolve the printer's noise issue.
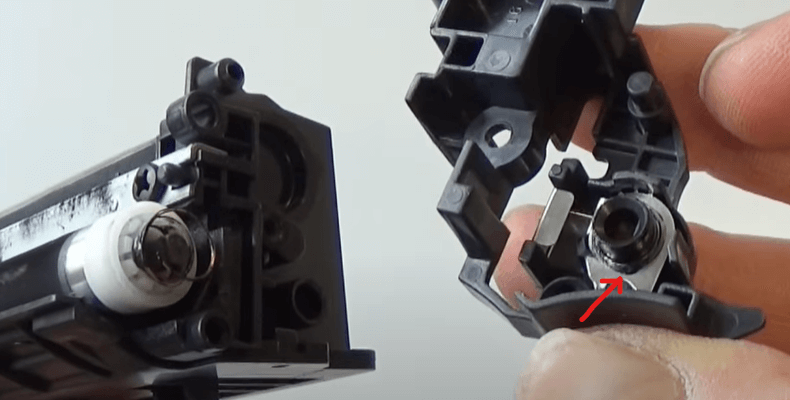
Developer Roller Contact
The developer roller contact rotates against a metal plate. To ensure smooth operation, apply a small amount of conductive grease to lubricate the contact area using Q-tip. If the contact of the magnetic roller is damaged, it can result in a clicking sound.
3. Fusers' Roller Bushings
If you hear a noise for a few seconds after you finish printing, it could be coming from the fusers. When the bushings wear down, they may create a squealing sound as they make contact with the rotating metal of the fuser roller shaft. If you prefer not to replace the bushings, you should at least apply high-temperature lubricants to the contact point between the bushings and the rotating metal of the fuser roller shaft using a Q-tip. Remember that fusers reach temperatures of 100 degrees or higher, so regular lubricants should not be used. Remember, less lubricant is better in this case.
4. Printer Drive Gears
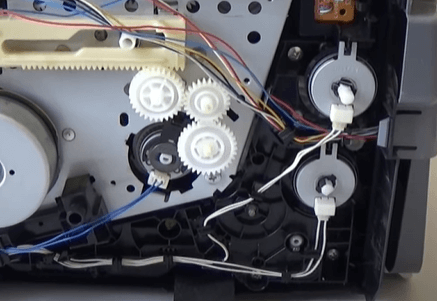
If you have tried the above steps but to no avail, then the issue might be caused by the printer gears. The printer drive gears can become worn over time, and even minimal wear can lead to noisy printing. Although the wear may not be easily visible upon visual inspection, it can still impact the printer's performance. To address this issue, lubricate the gears using a specialized grease designed for mechanical parts using a Q-tip. It is important to use the appropriate amount of grease, as using less is generally better for optimal functioning.
5. Printer Cooling Fan
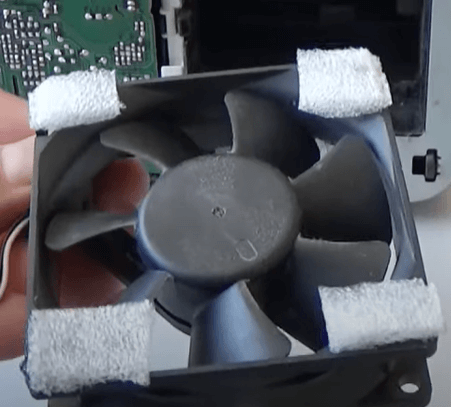
Printers often have a cooling fan positioned behind a grid to ensure proper ventilation and prevent overheating. However, because the fan is in constant motion and rotation, it can sometimes produce unusual noises.
Reduce printer fan noise with foam padding. Worn fan bushings can create a loud friction sound when the lubricant dries up. To reduce the noise, apply foam padding around the fan. This helps reduce the noise caused by the fan when it starts to wear out and the lubricant dries up.
6. Paper Feed Rollers' Shaft
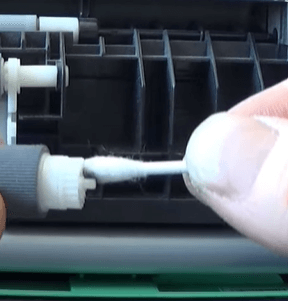
One more rotating part that can cause issues is the paper feed rollers. It's important not to lubricate the rollers themselves as they come into direct contact with the paper during the feeding process. However, you can lubricate the shafts of the paper feed rollers using a grease specific for mechanical parts to ensure smooth rotation and operation.
Parting Words:
We hope this guide has been helpful in addressing common toner cartridge problems and improving your printing experience. Dealing with laser printer toner problems can be frustrating, but you can solve them with the right knowledge and techniques.
Remember, fixing toner or laser printer drum problems requires patience and careful attention to detail. If you've tried everything we mentioned and the issues persist, seeking assistance from your printer manufacturer or a professional might be useful.
We hope these tips and solutions have given you the confidence to troubleshoot any toner problems and enjoy high-quality prints. If you need further assistance, feel free to contact our customer service department. You can reach us toll-free at 1-833-465-6888, Monday to Friday, from 6:30am-3:30pm PT.
Index
- Toner Not Recognized/Non-OEM Error Message
- Printer Door Open Error Status
- My Toner Won't Fit
- Low Toner/Toner Life End/Replace Toner Error
- Laser Printer Poor Print Quality
- Printer Printing Wrong Colors
- Print Color Not Matching the Screen Color
- Leaking Toner Cartridge
- Squeaky or Grinding Noises from Printer