
Do you rely on your printer for daily tasks? While printers have been a great help in our daily lives, like any other printer, Epson printers can sometimes encounter issues that stop them from working correctly. These issues can include trouble connecting to your computer, paper jams, or even printing faded photos. So, how to troubleshoot Epson printer issues? Well, fixing these common issues with your Epson printer can be easy if you know what to do. That's why in this guide, we'll discuss some Epson printer problems and solutions to help you fix your printer and get back to printing smoothly. Print stress-free again!
This guide will cover the top 8 common Epson printer problems and solutions:
- Printer Not Printing/Responding
- Printer Offline
- Paper Jams
- Poor Print Quality
- Can't Print via Phone/iPad
- Noisy Printer
- Printer Printing Slow
- Scanner Not Working
How to Troubleshoot Epson Printer: Initial Checks and Quick Fixes
Before you get into more complex solutions for your Epson printer not printing, it's a good idea to start with some simple checks. These quick checks can quickly find and fix common problems, saving you time and trouble. Here's what you can do:
1. Check the Status Indicator
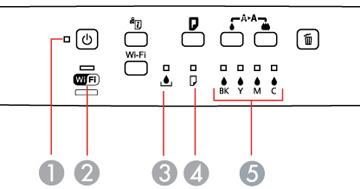
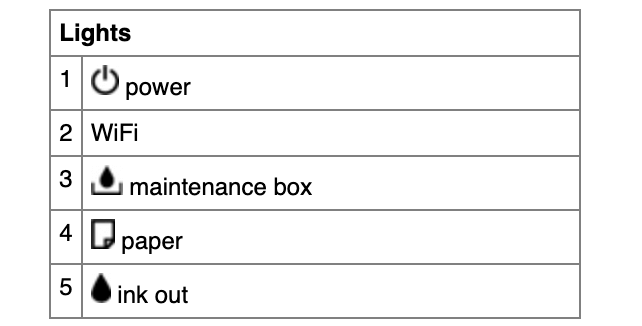
Look at the lights on the printer. They might blink or behave oddly if something's not right. Here are some different standard Epson status lights and solutions:
If the Light is On:
A. Maintenance Box Light
The maintenance box in an Epson printer collects ink waste when you print. Over time, it gets full. When the maintenance box reaches its capacity or end of service life, it must be replaced with a new one to ensure the printer continues functioning correctly. To fix this, follow these steps:
- Press the printer's black and color cleaning buttons simultaneously to remove the error.
- After that, insert a new maintenance box or replace the current one with a new one.
B. Paper Light
If the Paper Light is on, it indicates a problem with the paper. Here's what you can do:
- Add more paper to the tray or rear MP tray. Then, press the paper feed button to keep printing.
- If too much paper gets fed, press the paper feed button to remove the extra paper.
- Check if there's a paper jam. If so, gently remove the stuck paper.
- If the paper size you picked doesn't match the paper in the tray, press the paper feed button to fix it. Choose the right paper size this time.
- Make sure the paper tray is in place. Then, press the paper feed button.
C. Ink Out Light
When the Ink Out Light is on, it means one of the ink cartridges is either empty or not correctly installed. To resolve this:
- Refill or replace the empty ink cartridge with a new one.
- Ensure the ink cartridge is correctly installed in its designated slot.
D. Orange Wifi Light
If the Orange WiFi Light is on, it suggests a problem with the Wi-Fi connection. To address this:
- Press the WiFi button on the printer to attempt to reconnect to the Wi-Fi network.
- Ensure the Wi-Fi network you're trying to connect to is available and functioning correctly.
- Check if your printer is close enough to the Wi-Fi and nothing is blocking it.
- If needed, turn off and on your router and try connecting your printer to the Wi-Fi again.
If the Light is Flashing:
A. Power Light
If the Power Light is on, it means your printer is turned on and ready. If it's flashing, it might mean the printer is busy. Just wait for it to stop flashing before turning off the printer. If the Power Light is off, check if the printer is plugged in and the power outlet is working. Press the power button to turn it on again.
2. Check the Power and Cable
Make sure your printer is plugged in and turned on. Check if the cable connecting your printer to the power source is securely connected at both ends. You can also try restarting both the printer and your computer to refresh the connection. Also, look at the cable to see if it's damaged and needs replacing.
3. Run the Epson Printer Troubleshooting Function
You can use the Epson printer troubleshooting function to diagnose the issue quickly. Here are some steps you can follow for Windows and Mac:
 For
Windows:
For
Windows:
- Step 1: Open the Control Panel from the Start menu.
- Step 2: Click "Devices and Printers" or "View devices and printers".
- Step 3: Right-click on your Epson printer and select "Troubleshoot" from the context menu.
- Step 4: Follow the on-screen instructions provided by the troubleshooting wizard to diagnose and fix any issues with your printer.
 For
Mac:
For
Mac:
- Step 1: Open "System Settings" from the Apple men
- Step 2: Click "Printers & Scanners" or "Print & Fax".
- Step 3: Select your Epson printer from the list of available printers.
- Step 4: Click the "Open Print Queue" or "Options & Supplies" button.
- Step 5: Look for a "Troubleshoot" or "Utility" option within the printer settings and follow the instructions to troubleshoot any issues.
Epson Printer Problems and Solutions: Guide to Resolve the Top 8 Issues
If your Epson printer isn't working even after you've done the initial checks, take a look at the following additional Epson printer problems and solutions you can do to fix them:
1. Epson Printer Not Printing/Responding
There are a few reasons why your Epson printer might not be working. It could be due to paper jams, the printer not being set as the default, outdated drivers, or other problems. Here's how to troubleshoot Epson printer not responding:
A. Paper Jams
If there's a paper jam, the printer might not respond. To learn how to fix it, look at the instructions for dealing with paper jams in point #3 Paper Jam issue below.
B. Printer Not Set as Default
This often happens when you switch between different printers for printing tasks. Follow the steps below to set your preferred printer as default.
For Windows:
- Step 1: Click on the Start menu, then choose "Settings".
- Step 2: In Windows 10, select "Devices". For Windows 11, click on "Bluetooth & Devices".
- Step 3: Click on "Printers & Scanners". Find your printer (if you have more than one), then click "Set as default". If you don't see "Set as default", choose "Let Windows manage my default printer" instead.
For Mac:
- Step 1: Click on the Apple menu, then go to "System Settings", and select "Printers & Scanners" (you might need to scroll down).
- Step 2: In "Printers & Scanners", right-click on a printer in the list, then choose "Set Default Printer" from the menu that appears.
C. Stuck Print Jobs
When print jobs get stuck in the printer queue, it can stop the printer from working. This is like having a traffic jam. Clearing these stuck jobs fixes the problem, so the printer can start printing again as usual. To troubleshoot this:
For Windows:
- Step 1: Type "printer" in the search bar and select "Printer & scanners".
- Step 2: Click on your printer, then choose "Open print queue".
- Step 3: Find your documents in the list, select each one, click Document, and choose "Cancel" to delete them.
For Mac:
- Step 1: Click on the Apple menu, then go to "System Settings" and select "Printers & Scanners".
- Step 2: From the list, choose your printer, and click "Open Print Queue".
- Step 3: Select the print job you want to cancel, then click the "X".
- Step 4: To clear everything, either press "Command + A" then "Command + delete" on your keyboard, or click "Printer" in the menu and choose "Cancel All Documents".
D. Antivirus Interference
Antivirus software is essential for keeping your device safe, but sometimes it can cause problems. To see if it's causing issues with your printer, try turning off the firewall. If the printer starts working again, then the antivirus might be the problem.
To Turn Off the Firewall in Windows:
- Step 1: Click on the Start menu and select "Settings".
- Step 2: Go to "Update & Security".
- Step 3: Choose "Windows Security" from the left sidebar.
- Step 4: Click on "Firewall & network protection".
- Step 5: Under the "Firewall & network protection" section, click on the network profile you're currently using (such as Domain, Private, or Public).
- Step 6: Toggle the switch to turn off the firewall.
To
Turn Off the Firewall on a Mac:
- Step 1: Click on the Apple menu and select "System Settings".
- Step 2: Choose "Network".
- Step 3: Then click "Firewall".
- Step 4: Toggle the switch to turn off the firewall.
E. Outdated Printer Driver
If your printer's driver is outdated or corrupted, the printer won't function properly. This can lead to difficulties in connecting your computer to the printer, causing problems. To fix this, update your printer driver. Go to the Epson Download Center and follow the instructions to update the driver.
2. Epson Printer Offline
If your printer is still offline even after the initial checking, the issue below might be the reason:
Printer Configuration Problems
A. Printer Configuration Needs Refreshing
Remove and reconnect your printer back to the computer to refresh the printer configuration.
B. Printer Not Set as Default
Make sure your printer is set as the default printer on your computer. Sometimes, printer offline issues occur because the wrong printer is selected.
C. Printer is in Offline Mode
If the "Use Printer Offline" mode is turned on, your computer won't try to connect to the printer for printing. Check the Printers & scanners option in your computer's Settings menu to ensure your Epson printer is not Offline.
For more details on how to troubleshoot Epson printer when it is offline, check this guide on how to fix printer offline problems.
3. Epson Printer Paper Jam
Paper jams are often caused by issues like damaged rollers, using incompatible paper, improper loading, open printer doors, or hardware damage. To fix Epson printer not working problem due to paper jams:
- Step 1: Turn off and unplug the printer. Cancel all print jobs and ensure the printer is off at the plug.
- Step 2: Remove all paper from the tray and reload it correctly. Incorrect paper loading is a common cause of jams. If there are stuck papers, slowly remove each sheet to prevent printer damage.
- Step 3: After confirming that there are no tray jams, stack the remaining paper neatly, ensuring it's securely inserted into the feeding slot.
- Step 4: Open the rear access door and ensure the rollers are clear of paper scraps. If there is, avoid pulling paper forcefully to avoid damaging the printer. Check if the rollers move freely and are debris-free. If dirty, clean gently using a damp towel.
- Step 5: Close the doors and restart the printer for a test run. This should help fix the issue.
Prevent paper jams by:
- Loosen the paper before loading it.
- Don't put too much paper in the printer.
- Use compatible paper for your printer.
- Try not to interrupt print jobs.
- Fill the paper tray only when it's empty.
- Make sure the paper is aligned properly.
- Store paper in a cool, dry place.
- Keep your printer clean.
- Make sure your ink is still good.
4. Epson Poor Print Quality
Before anything else, check if you have enough ink or toner. Low ink levels can often cause bad printing results.
A. Horizontal Lines (Banding)

If your prints have lines across them, try these solutions.
- Put the paper with the writing side facing up in the feeder.
- Clean the ink nozzles by running the Head Cleaning utility. You can also follow this guide for printhead cleaning.
- Align the print head using the print head alignment utility for better printing.
- Reset settings to default if needed.
- Avoid using the "Maximum" setting for Printable Area, as it may cause streaks in larger print areas.
- Make sure the paper type selected in the printer software matches the type of paper you're using.
- If available, enable "Micflex flex-col md:flex-row flex-wrap gap-6eave" in the Advanced settings for better print quality.
B. Vertical Misalignment or Bands
If your prints have uneven lines or bands, here's what you can do.
- Align the print head using the print head alignment utility for better printing.
- Clean the ink nozzles by running the Head Cleaning utility.
- Turn off the High Speed option in the Advanced settings.
- Make sure the paper type selected in the printer software matches the type of paper you're using.
- If applicable, enable Micflex flex-col md:flex-row flex-wrap gap-6eave in the Advanced settings.
C. Wrong or Missing Colors
If the colors in your prints aren't right, try these solutions.
- Adjust the Color setting in your printer software to "Color".
- Modify the color settings in your program or within your printer software's Advanced dialog box.
- Clean ink nozzles by running the Head Cleaning utility, especially if the printer has not been used for a long time.
D. Blurry or Smudged Prints
If your prints are blurry or smudged, follow these tips:
- Ensure the printer is on a stable, flat surface. Tilted positioning can affect its performance.
- Use undamaged and clean paper.
- Check that the paper type you choose in the printer software matches the type of paper you loaded.
- Avoid touching the printed side of glossy paper.
- Adjust Color Density and Drying Time settings.
- If loading and ejecting dry paper multiple times doesn't resolve the issue, there might be ink leakage inside the printer. In such cases, use a soft, clean cloth to gently wipe the printer's interior. Be cautious not to touch the gears inside the printer.
E. Print Quality Doesn't Improve
If cleaning doesn't work, you might have to install new ink cartridges. Doing this makes sure the printhead gets fresh ink, which can solve any issues causing poor print quality.
5. Can't Print via Phone/iPad
If you can't print from your phone or iPad, it might be because:
- Your device and printer aren't connected to the same Wi-Fi network.
- Your printer might not support printing from mobile devices.
- There could be a problem with your device's printer app or software. Try reinstalling the printer app or updating your device's software.
- Check if there are any print jobs stuck in the printer queue.
- Try restarting both your device and the printer.
To know how to print via mobile device, follow the steps in the following guide:
6. Noisy Printer
If your printer is making a lot of noise, it could be due to various reasons. Here are some common causes and solutions:
A. Paper Jam
Check for any paper jams inside the printer. Remove any stuck paper carefully to prevent damage to the printer. You can also follow the guide above to remove paper jams.
B. Misaligned Cartridges
If the printer cartridges are not aligned properly, it can cause noise. Open the printer and check if the cartridges are seated correctly.
C. Dirty Rollers
Dust or debris on the printer rollers can cause noise during printing. Clean the rollers with a soft cloth to remove any dirt.
D. Worn Parts
Over time, certain printer parts may wear out, leading to noise. If this is the case, you might need to contact a technician to repair the parts.
7. Epson Printer Printing Slow
If your printing is too slow, consider these potential causes and solutions:
A. Unnecessary Apps Running
Close any apps you're not using on your computer or device.
B. High Print Quality Setting
Lower the quality setting for faster printing.
C. Bidirectional Printing Disabled
Enable bidirectional (high-speed) printing. This allows the print head to move in both directions, increasing printing speed. Here's how you can enable it:
For
Windows:
- Step 1: Open the Control Panel from the Start menu.
- Step 2: Click on "Devices and Printers".
- Step 3: Right-click on your printer and select "Printer properties".
- Step 4: Go to the "Advanced" tab.
- Step 5: Check the box next to "Enable bidirectional support" or "Enable advanced printing features".
- Step 6: Click "Apply" and "OK" to save the changes.
For
Mac:
- Step 1: Open "System Preferences" from the Apple menu.
- Step 2: Click on "Printers & Scanners" (or "Print & Scan", "Print & Fax").
- Step 3: Select your printer from the list on the left-hand side.
- Step 4: Click on the "Options & Supplies" button.
- Step 5: In the window that appears, select the "Options" (or "Driver") tab.
- Step 6: Look for the setting named "High-Speed Printing" and enable it.
- Step 7: Close the window to save the changes.
8. Epson Scanner Not Working
If your Epson scanner isn't working, there could be several reasons why. To fix this, here are some basic checks you can do:
Initial Checks:
- Power: Make sure the scanner is turned on and has sufficient power. Check if any power indicators are lit up on the scanner.
- Connection issues: Ensure the scanner is correctly connected to your computer or network. Check all cables to ensure they are securely plugged in.
- Restart: Try restarting the scanner and your computer to see if that resolves the issue. Sometimes, a simple reboot can fix temporary glitches.
- Compatibility: Ensure the scanner is compatible with your computer's operating system. Some scanners may require specific drivers or software updates to be compatible with newer operating systems.
- Scanner bed: Clean the scanner bed and glass to remove any dust, smudges, or debris that may affect scanning quality or cause errors.
If scanning problems continue, look into the other causes below.
A. Scanner Doesn't Scan
- Not Ready: Ensure the scanner is turned on and ready to scan.
- Computer Asleep: If your computer is in standby or sleep mode, scanning won't work. Try restarting the scanning software.
- Operating System Update: After updating your computer's software, you may need to reinstall the scanner software to work correctly.
B. Can't Scan Multiple Images at Once
- Place the photos on the document table, leaving a gap of at least 0.8 inches (20 mm) between each photo.
- Ensure that your scanning program can scan multiple images.
Parting Words
Now you are armed with knowledge about common Epson printer problems and solutions! Just follow the simple steps above on how to troubleshoot Epson printer and fix the issues quickly, so you can start printing again without any trouble! However, if you're dealing with more complicated problems with your printer, it's best to get help from a professional. Get back to printing in no time!
Key takeaways:
- Keep an eye on the lights on your printer. They can tell you if there's a problem like paper getting stuck or ink running low. Understanding what these lights mean helps you quickly fix any issues.
- Ensure your printer is properly plugged into both the power outlet and your computer. If the connections aren't good, it can cause printing problems. So, double-check the cables and plugs to ensure everything is connected correctly.
- Sometimes, printer problems are too tricky to handle on your own. If you're stuck or the problem keeps returning, don't hesitate to ask for help from a professional technician or support service. They have the expertise to solve challenging printer problems.
If you have questions or inquiries about our remanufactured Epson cartridges, contact CompAndSave's customer service department. Call our toll-free number: 1-833-465-6888 Monday through Friday, 6:30am-3:30pm PT. Happy printing!
Frequently Asked Questions
- Step 1: Ensure your Epson printer is turned on and has the latest driver update installed.
- Step 2: Open the Control Panel on your computer.
- Step 3: Select "Devices and Printers" or "Printers & scanners".
- Step 4: Click on "Add a printer" or "Add a device".
- Step 5: Windows will search for printers. Choose your Epson printer from the list.
- Step 6: Follow the on-screen instructions to complete the setup.
- Step 7: When prompted, choose "Wi-Fi" or "Wireless" as the connection method.
- Step 8: Enter your Wi-Fi network name and password when prompted.
- Step 1: Ensure your Epson printer is powered on and updated.
- Step 2: Open "System Settings" on your Mac.
- Step 3: Click on "Printers & Scanners" or "Print & Fax".
- Step 4: Press the "+" button to add a new printer.
- Step 5: Your Mac will search for printers. Select your Epson printer.
- Step 6: Follow the on-screen instructions to complete the setup.
- Step 7: When asked, choose "Wi-Fi" or "Wireless" for the connection.
- Step 8: Enter your Wi-Fi network details when prompted.
- Step 1. Turn on your Epson printer.
- Step 2. Download and install Epson product unit driver software according to your Windows version.
- Step 3. Check the terms in the License Agreement box. Click Next.
- Step 5. Click Install.
- Step 6. Select your Epson product, click Next.
- Step 7. Select Printer Registration, click Next.
- Step 8. Select Agree, click Next.
- Step 9. Register your printer to Epson Connect. Click OK.
- Step 10. Create an account or sign in with your existing Epson account.
- Step 11. Click Close.
If your Epson printer is not responding, begin with some initial checks like ensuring there are no loose cables, confirming a stable network connection, and trying a basic troubleshooting step of unplugging and then replugging both the printer and the computer.
If the problem continues, try the previous troubleshooting steps. Check for antivirus problems, fix paper jams or physical issues, set your main printer as default, update old printer drivers, and clear stuck print jobs. These steps should help your printer start working again. For more detailed instructions, refer to our guide for fixing the Epson printer not printing anything.
Start by plugging the printer into another outlet to ensure the outlet isn't causing the issue. If the power cord and outlet are good, check the power button. Sometimes, a faulty power button can stop the printer from turning on. See if the power button is stuck, loose, or broken. If this won't fix the problem, it will be best to contact Epson support.