
Dealing with ink cartridge problems? No need to worry, you're not alone in this situation. Whether you're wondering how to get a remanufactured ink cartridge to work or encountering problems with print quality, we've got you covered.
We've compiled a list of the most common printer ink problems. This guide will cover the following topics:
- Ink Cartridge Not Recognized/Non-OEM Error Message
- Poor Printing Quality
- Printer Printing Wrong Colors
- Print Color Not Matching the Screen Color
- Printer Ink Leaking
- Low Ink Level
- My Cartridge Won't Fit
For toner cartridges, check our guide on how to troubleshoot common toner cartridge problems.
Printer Ink Problems: Troubleshooting Tips
1. Ink Cartridge Not Recognized/Non-OEM Error Message
Alright, let's dive into the nitty-gritty! Below, we'll explore some of the usual suspects behind those frustrating non-recognition ink cartridge problems.
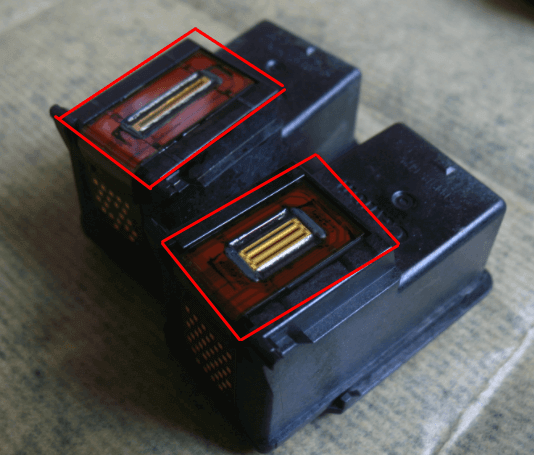
Did Not Remove the Tape or Tabs on the Ink Cartridge
Check to see if you were able to remove the tape that covered the nozzle. The tape is usually a bright color like yellow or orange, or it might be clear.
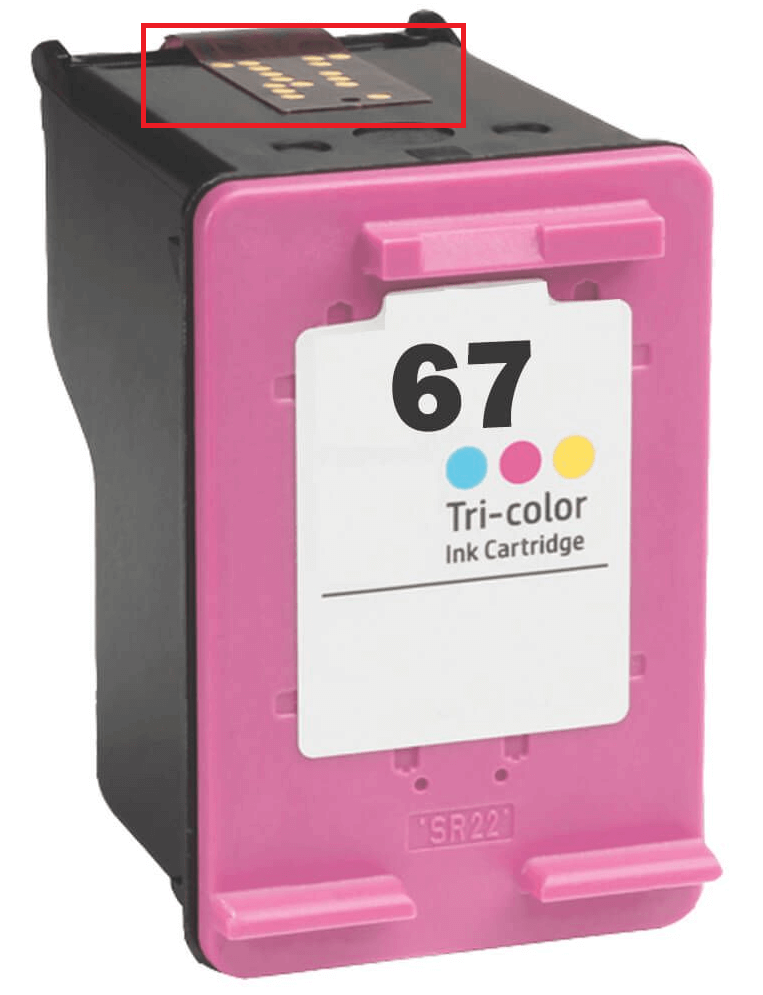
Wrong Ink Cartridge Model
Make sure you use the correct ink cartridge for your printer. Even if some cartridges may look similar in shape and size, your printer will reject them if they are not the right model. If you're uncertain, you can refer to our tips on how to find the right ink for your printer for guidance.
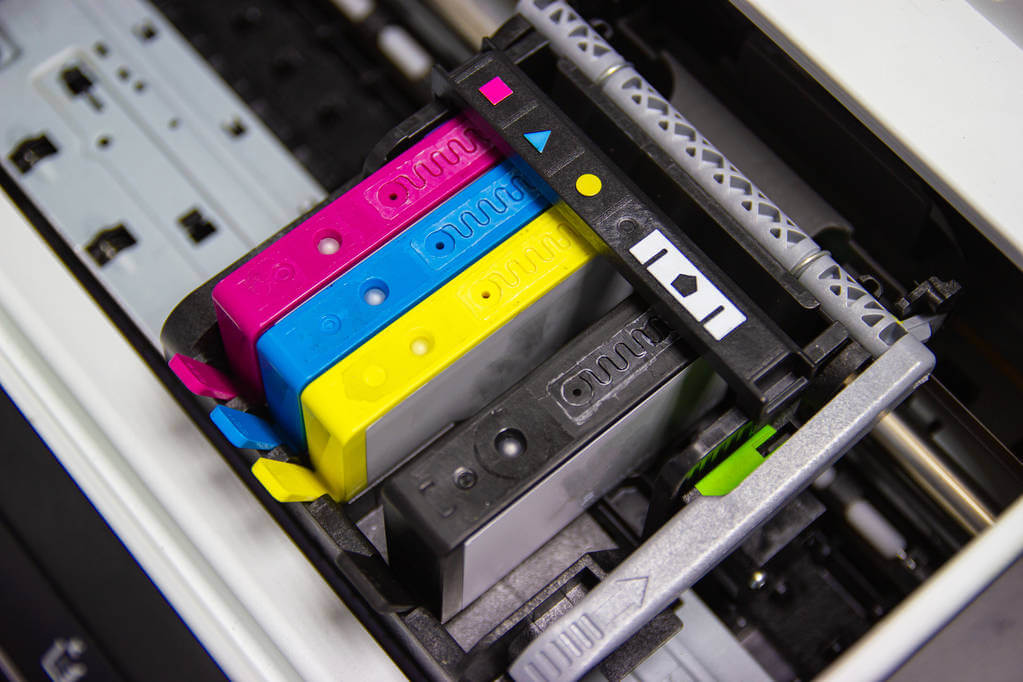
Correct Ink Model, Wrong Color Slot
If you have the right ink cartridge for your printer but it's not being recognized, double-check if it is inserted into the correct color slot. Placing a color cartridge in the black slot can lead to recognition problems. Typically, the cartridge slots in your printer are color coded to help you identify the correct placement.
Right Ink, Wrong Installation
Correct installation is crucial when it comes to ink cartridge recognition. Upon installing an ink cartridge, make sure you hear a clicking sound indicating that it has been properly installed. To ensure proper installation, refer to step-by-step guides provided by the specific brand of your printer, such as HP, Epson, Canon, and Brother. These guides will provide detailed instructions on how to change the ink cartridge correctly.
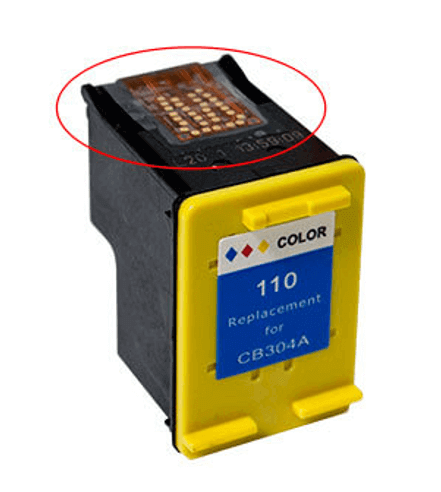
Dirty or Damaged Chip
As you may already know, the dirty chip can cause non-recognition issues. Check if the golden chip or circuitry on the ink cartridge is damaged or dirty. If it is, follow these steps:
If dirty:
- Step 1.
Turn off your printer and carefully remove the ink cartridge. Avoid touching the electronic components on the chip to prevent damage. - Step 2.
Take a soft, lint-free cloth and gently wipe the golden chip or circuitry to clean it without touching electronic components. - Step 3.
After cleaning, reinstall the ink cartridge by gently pushing it into the slot until it clicks into place. - Step 4.
Turn your printer back on and check if it recognizes the ink cartridge this time. If not, you can try cleaning the printhead as an additional troubleshooting step.
If damaged:
In this case, the best solution is to replace the ink cartridge with a new one. Printer ink troubleshooting will not work anymore with a damaged chip.
Inkjet Printer Regional Coding
If you purchased your printer in Region A and try to install ink cartridges purchased in Region B, your printer will not accept them due to region coding enforcement. This applies to some printers, regardless of whether you are using original or remanufactured cartridges.
Before following the steps below, it's important to determine if your printer has region coding. To do this, simply search for your printer model and the term "region coding" on Google. For example, you can search for "HP DeskJet 2700 region coding". If unsure what your printer model is, you can check our tips on how to find your printer name.
If there is no region coding, you can check the other reasons why you're experiencing non-recognition problems. If your printer does have region coding, you have several options:
- Option 1:
You can continue to purchase cartridges from your previous region, but this can be expensive as you will need to pay shipping fees and possibly other additional fees. - Option 2:
Another possibility is to have your empty ink cartridges refilled or refill them yourself. However, please note that the process can be messy, especially if you're new to it. Make sure to gather all the necessary tools and have a manual with clear instructions at hand. - Option 3:
An alternative is to consider swapping the cartridge part containing the chip. Keep in mind that this should be approached cautiously and at your own risk. Fortunately, there are YouTube tutorials readily available to provide step-by-step guidance throughout the process. - Option 4:
Contact your printer manufacturer to determine if they will allow you to change the region code of your printer. Keep in mind that first-level support staff may not be aware of this option. If you encounter this, kindly ask to speak with a supervisor or manager and follow their instructions to resolve the issue. Note that printer manufacturer support may not assist you if you use third-party ink cartridges. - Option 5:
If you want to avoid any potential risks, you can consider purchasing a new printer that is specifically designed for the region you have moved to. When selecting a printer, make sure to choose one that offers the flexibility to disable any measures or features that restrict the use of third-party ink. This will give you greater control over the ink you want to use and the printer's software. Additionally, it's advisable to choose a printer that allows you to manually control firmware updates, enabling you to update it according to your preferences.
Printer Firmware Issue
If you are using third-party ink cartridges, check your printer's firmware to see if it has been updated. Printer manufacturers like HP and Epson release firmware updates not just to fix bugs but also to restrict the use of third-party ink cartridges. If this is the case, you may need to downgrade your printer's firmware version to continue using remanufactured ink cartridges. You can follow our downgrade instructions for HP and old firmware download steps for Epson.
NOTE: If you use a remanufactured ink cartridge, we do not encourage updating your printer's firmware, as it will limit the use of third-party ink cartridges.
Other Possible Reasons
Printer manufacturers have taken steps to restrict the use of third-party ink or toner cartridges, beyond just firmware updates. HP's HP+ program is one example of such measures. Enabling HP+ on a compatible printer ensures that it will only function with genuine HP cartridges throughout its lifespan. To learn more, please refer to our article on the HP+ program.
2. Poor Printing Quality
Signs of poor printing quality:
- Blurry printouts
- Streaky or smudged prints
- Color mixing / Cross-contamination
- Printing has white lines or missing prints
- Black and white images have specks of color
Common reasons for poor printing quality:
Low Ink Level
If your printer is indicating a low ink level, start by checking if there is any ink remaining in the cartridge. If the ink level is low or depleted, it could be the reason for the poor printing quality. In such cases, replacing the cartridge with a new one is recommended to resolve the issue.
However, if still some ink is left, you can attempt to redistribute it by gently shaking the cartridge. To avoid any spills, please follow these tips:
- Step 1.
Remove the cartridge from the printer to prevent ink from spilling onto your printer or workspace. Avoid touching the nozzles or copper contacts to prevent damage to the ink. - Step 2.
Hold the cartridge by its sides and gently shake it back and forth a few times. Carefully do this to prevent any ink leakage. - Step 3.
After shaking, check for leaks or damage, such as wet spots or stains on the cartridge or your hands. If none are found, reinstall the cartridge in the printer.
Clogged Printhead
Clogged printheads can lead to poor printing quality, especially if the printer is not used regularly. Cleaning the printhead is essential to address this issue, and there are two methods to do so: using the printer's software for a printhead cleaning cycle or manually cleaning it.
Before you start cleaning, it's recommended to run a test print to determine which specific ink cartridge requires cleaning. To resolve a clogged printhead, you can watch our video on how to clean printer heads or follow the tips provided below:
Printhead Cleaning Cycle
To automatically clean your printer's clogged printhead, follow these steps:
- Step 1.
Check your printer's display menu and navigate to Printer Maintenance. - Step 2.
Choose the Clean Printhead function and wait for the cycle to complete. - Step 3.
Once finished, run a test print to check if the quality has improved.
If the printouts still have poor quality after the printhead cleaning cycle, you may need to run the cycle up to 3 times. However, keep in mind that excessive cleaning cycles can further deplete your ink resources.
If multiple cleaning cycles do not resolve the issue or if you prefer to save on ink, manual printhead cleaning is the way to go.
Manually Cleaning Printhead
If the cartridge has an integrated printhead:
- Step 1.
Prepare a damp paper towel and a separate dry paper towel before cleaning your ink cartridge. We recommend wearing gloves to protect your hands from any possible ink leaks. - Step 2.
Remove the ink cartridge from the printer. Be careful not to touch the circuitry or damage the delicate parts of the printhead. - Step 3.
Place your ink cartridge on the damp paper towel with the nozzle facing down, then gently tap it several times to shake the ink inside. - Step 4.
Gently slide the ink cartridge from the top to the bottom of the paper towel multiple times until you observe clear bars of color. - Step 5.
Next, gently blot it using a dry paper towel. Make sure to be careful and thorough, ensuring that all moisture is completely removed. - Step 6.
Lastly, install the ink cartridge back into the printer and run a test print to confirm that the printhead is functioning correctly.
If the printhead is integrated into the printer:
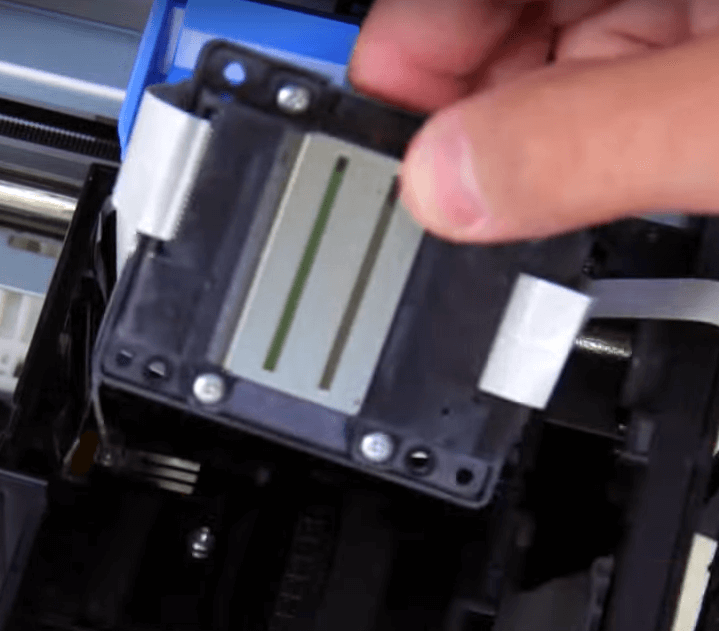
- Step 1. Prepare a dry paper towel that is folded into quarters, a plastic tub, distilled warm water, isopropyl alcohol, and rubber gloves.
- Step 2. Pour a 50/50 mixture of isopropyl alcohol and distilled warm water into a plastic tub, making sure that the mixture is about half an inch deep to fully submerge the printheads.
- Step 3. While wearing rubber gloves, take out all ink cartridges from the printer to access and remove the printhead which is integrated into the printer. You may need to disassemble or unscrew it from the printer to do so.
- Step 4. After removing the ink cartridges, place the printhead part into the mixture of 50/50 isopropyl alcohol, distilled warm water, and let it soak for two minutes.
- Step 5. Next, carefully remove it from the mixture and place it onto a dry paper towel. Gently dab the printhead with the towel until it is completely dry.
- Step 6. Reinstall the printhead into the printer and put back all the ink cartridges.
- Step 7. Lastly, print a test page to check if the printhead is working correctly. If you notice streaks, smears, or missing lines, you can soak the printhead for a longer time, up to overnight, depending on the outcome of the test.
Type of Paper Used
- Thin or Low-quality Paper. The ink from the printer may seep through the paper fibers, causing the ink to bleed and blur the printed text or image.
- Paper Coating. Using the wrong type of coating on paper can cause the ink to smudge or smear on the surface, resulting in poor print quality. The low-quality coating can also lead to inconsistent ink absorption, causing prints to look blotchy or faded.
- Paper Texture and Finish. Rough paper texture can make ink bleed and feather, which makes text and images appear fuzzy or blurry. On the other hand, uneven paper texture can result in inconsistent ink absorption, causing uneven color and tone.
To solve this, you can:
- Adjust printer settings.
If you're experiencing poor print quality due to thin or low-quality paper, try adjusting your printer settings. You can try adjusting the print quality or increasing the ink density to compensate for the paper's limitations.
For Windows- Open the print dialog box by pressing Ctrl + P keys on your keyboard.
- Select your printer from the list of available printers in the print dialog box.
- Click on the "Properties" or "Preferences" button to open the printer settings.
- Look for an option related to print quality, density, or print resolution. The exact wording may vary depending on your printer model.
- Adjust the print density or quality settings to a higher value. You may have a slider or dropdown menu to choose from different print quality options.
- Preview the changes in the print preview section, if available, to see how they will affect the printout.
- Click "OK"or "Print" to start printing with the adjusted print density settings.
For Mac- Open the print dialog box by pressing the Command + P keys on your keyboard.
- Open the Print dialog box and choose your printer from the list of available printers.
- Click on the "Copies & Pages" or "Quality & Media" option to open the printer settings.
- Look for an option related to print quality, density, or print resolution. The exact wording may vary depending on your printer model.
- Adjust the print density or quality settings to a higher value. You may have a dropdown menu or a slider to choose from different print quality options.
- Preview the changes in the print preview section, if available, to see how they will affect the printout.
- Click "Print" to start printing with the adjusted print density settings.
- Replace the paper.
If you are still unsatisfied with the print quality even after adjusting printer settings, replace your paper while keeping in mind the following:- Choose the right paper.
Choose a paper that is compatible with your printer and the type of printing you are doing. Paper varies in coating, finish, and texture so ensure to do your research before buying a new one. Look for papers with a recommended weight and texture that matches your printer's specifications. - Use high-quality paper.
Higher-quality paper is less likely to cause printing issues. Look for high-quality paper designed for your specific printing needs and compatible with your printer.
- Choose the right paper.
3. Printer Printing Wrong Colors
The ink cartridges in your inkjet printer are split up into four colors. From time to time, one color may run out before another. For example, if you're printing a forest scene and the leaves appear more yellow than green, your cyan cartridge may need to be replaced.
Cartridge to troubleshoot if:
- Trying to print BLUE, but it looks CYAN, then troubleshoot your MAGENTA.
- Trying to print BLUE, but it looks MAGENTA, then troubleshoot your CYAN.
- Trying to print RED, but it looks YELLOW, then troubleshoot your MAGENTA.
- Trying to print RED, but it looks MAGENTA, then troubleshoot your YELLOW.
- Trying to print GREEN, but it looks YELLOW, then troubleshoot your CYAN.
- Trying to print GREEN, but it looks CYAN, then troubleshoot your YELLOW.
Solution to printer printing wrong colors:
- Check ink levels.
Make sure that your cartridges have enough ink and that they are correctly installed. If there's little to empty ink, you will need to replace the cartridge. If there is still ink, you will need to clean the printhead of the faulty color ink. Check the above reference to know which color needs cleaning.But I am using a tricolor cartridge. What should I do?
If one of the colors has run out in your printer's tri-color ink cartridge, you have two options:
If you don't often print in color, you can switch the printer's setting to grayscale or black and white. This will let you keep using the remaining ink until you can replace the cartridge. Printing in grayscale uses less ink and helps your remaining ink last longer.
To switch to grayscale, go to the printer settings in the print dialog box and choose grayscale or black and white. Look in your printer manual or online for specific instructions for your printer.
- If you print in color a lot, you'll need to replace the whole cartridge, even if the other colors still have ink. This is because the tri-color cartridge contains all three colors in one, so you can't replace just the empty color. Replacing the cartridge will ensure your prints still have the right colors and quality.
- Check the color settings.
Ensure your printer's color settings are set to the correct color mode. For example, if you're printing a photo, make sure that the color mode is set to "photo" or "color" rather than "black and white" or "grayscale." - Clean printhead.
If you've tried other troubleshooting methods and the problem persists, you can run a printhead cleaning cycle or clean the printhead manually as a last resort. Cleaning the printhead can help unclog or remove any dried-up ink from the faulty cartridge's nozzle. Refer to 'Clogged Printhead' for instructions.
4. Print Color Not Matching the Screen Color
Here's how to fix the issue of print colors not matching the screen colors by calibrating your computer screen. Note that specific options and settings may differ based on your printer and operating system. Below are the general steps:
- Calibrate with a tool.
You can calibrate your computer screen using an advanced calibration tool like a colorimeter or spectrophotometer. Note that using a calibration tool will help you achieve the same level of accuracy as professional calibration tools.
- Calibrate without a tool.
If you choose to calibrate without a tool, you can use the built-in calibration tools on your computer's operating system.
For Windows PC:
Windows Search > search for 'display calibration' > Calibrate display color. (Follow the instructions on the screen to modify the brightness, contrast, and color settings until the colors appear accurate.)For Mac:
System Settings > Displays > Color > "Calibrate". (Follow the on-screen instructions to adjust the brightness, contrast, and color settings until the colors look accurate.)
5. Printer Ink Leaking
Before you follow the steps below, ensure that the printer is not damaged. If your printer is damaged, it's recommended to replace it instead of installing the cartridge.
Overfilled Cartridge
If the printer ink leaks inside the package, it's overfilled. Manufacturers occasionally overfill some cartridges, even genuine ones.
What to do:
- Wearing rubber gloves, open the package over a sink or a garbage can to avoid any leaks that could damage your belongings.
- Place the cartridge on a paper towel with the printhead facing down for a few minutes to make sure there are no leaks.
- Next, clean the ink cartridge, and inspect the cartridge for any stains, wet spots, cracks, or breaks in the plastic part. You can use a white tissue to wipe the plastic part of the cartridge (avoid touching the chips or golden circuitry).
- If there is no ink stain, you can proceed with installing it. If damaged, it will be best to purchase a new one.
Internal Pressure in the Cartridge
One cause of ink leakage is the unbalanced internal pressure in the vacuum. The cartridge should work fine anyway.
What to do:
- Let the cartridge sit on a paper towel for a few minutes. The printhead should be facing down.
- Wearing rubber gloves, clean the ink cartridge, and inspect the cartridge for any stains, wet spots, cracks, or breaks in the plastic part. To clean the plastic part of the cartridge, you can use a white tissue. Be cautious and avoid touching the chips or golden circuitry while wiping.
- If there are no ink stains or damages, you can proceed with installing the cartridge. However, if it is damaged, it would be best to purchase a new one.
Ink Not Installed Properly Causing Leaks
Improper installation is also a cause of ink cartridge leaks.
What to do:
- Uninstall the leaking cartridge, clean it, as well as the printer.
- Put on rubber gloves and carefully inspect the cartridge for any signs of stains, wet spots, cracks, or breaks in the plastic part. Use a white tissue to gently wipe the plastic surface of the cartridge, taking care to avoid touching the chips or golden circuitry.
- If there are no ink stains present, you can proceed with installing the cartridge. However, if the cartridge is damaged, it is advisable to purchase a new one for optimal performance.
Temperature Changes
In places with high-temperatures, when you open the cartridge, you may notice ink bubbling or dripping out. This ink cartridge problem happens because the cartridge has been exposed to heat for a long time, which creates pressure inside the sealed cartridge. When you open it, that pressure blows the ink out when the cartridge is opened.
What to do:
- Chill the cartridge in the refrigerator (not the freezer) for a couple of hours before use.
- After this, wearing rubber gloves, clean the ink cartridge, and inspect the cartridge for any stains, wet spots, cracks, or breaks in the plastic part. Take a white tissue and gently wipe the plastic part of the cartridge, being careful not to touch the chips or golden circuitry.
- Check if there are any ink stains on the tissue. If there are no stains, you can proceed with installing the cartridge. However, if the cartridge is damaged, it is recommended to purchase a new one for optimal performance.
6. Low Ink Level
Below are the common reasons for receiving a low ink level error message and troubleshooting tips for each:
Ink Cartridge is Running Low
Check that the ink cartridges are correctly installed and have sufficient ink. If they are low, replace them with new ones.
Incompatible Ink Cartridges
When using third-party ink cartridges, it's common to encounter printer ink problems like low ink levels. Remanufactured cartridges are filled with ink, but some printers need a complete reset of the ink levels during the remanufacturing process. However, if your printer is still printing well despite the low ink message, you can safely ignore the error and click "OK" or "Continue" to keep printing.
If your printer doesn't continue printing, you have two options:
Option 1: Bypass the low ink message
You can do this by pressing and holding the "stop" or "cancel" button for 10 seconds on certain Epson and Lexmark printers. This will reset the ink counter and allow you to use the cartridges normally.
Option 2: Perform a simple reset process:
- Take out the cartridge.
- Turn off the printer.
- Unplug the power cord.
- Wait for 5-15 seconds, then plug it back in.
- Turn printer back on.
- Reinstall the cartridges.
If the printer still doesn't allow you to print after the reset process, try reinstalling the printer driver on your computer. This can help resolve any software-related issues that may be causing the problem.
You may still see the "Ink Low" message after resetting and reinstalling the driver. This occurs because the chip in the cartridge couldn't be reset. However, if you know there is still ink in your cartridge, you can safely ignore the message and continue printing normally. The ink levels are not actually low, and you can continue printing without any issues.
Dirty or Clogged Contacts
Sometimes, the ink cartridges may become clogged with dried ink, preventing the ink from flowing properly. You can clean the cartridges' printhead by following the instructions in 'Clogged Printhead' under poor printing quality.
Faulty Ink Cartridge Chip
If none of the above tips work, you can do the following:
- Remove the cartridge from the printer.
- Clean the chip on the ink cartridge gently. Use a soft, lint-free cloth or a cotton swab. Be sure to avoid using any abrasive materials, as they can scratch or damage the chip. Simply dampen the cloth or swab with a small amount of water or isopropyl alcohol, and gently wipe the chip to remove any dust or debris that may be interfering with the connection. Avoid rubbing the chip too hard, as this can also damage it.
- Reinstall the cartridge and check if the error still occurs. If it does, you can try resetting the chip using a chip resetter. If that doesn't work, your last option is to purchase a new cartridge.
7. My Cartridge Won't Fit
If you're having trouble fitting your cartridge into your printer, below are the reason and solutions to fix the issue.
Wrong Ink Cartridge Model
To ensure proper functionality, it's crucial to use the correct ink cartridge that is compatible with your printer. Even if cartridges may appear similar in shape and size, the printer will only accept them if they are the right match. If you're uncertain about the correct ink cartridge, we have helpful tips available to guide you in finding the correct ink for your printer.
Correct Ink Model But Installed in Wrong Color Slot
If you have the correct printer ink that is compatible with your printer but it is not being recognized, double-check the placement of the cartridge. Ensure that the color cartridge is installed in the designated color slot and not mistakenly placed in the black slot. Installing a color cartridge in the wrong slot can lead to issues with recognition by the printer.
Did Not Remove Tape or Plastic Coverings
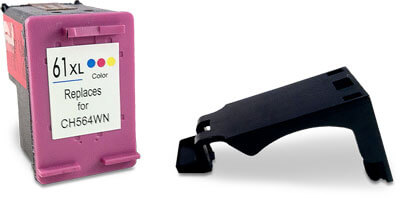
Check to see if you have removed the tape that covers the nozzle of the ink cartridge. The tape is typically brightly colored, such as yellow or orange, or it may be clear.
Additionally, make sure that you have removed the plastic protective case from the cartridge, similar to the black one shown in the photo.
Correct Ink But not Installed Properly
If you have the correct printer ink installed in the right color slot, ensure it is installed correctly. Uninstall and reinstall the ink cartridge until you hear a clicking sound, indicating it is properly installed.
Obstruction in the Cartridge Slot
To check for obstructions in the ink cartridge slot, visually inspect the slot for debris or foreign objects. If needed, you can use a flashlight to get a clear view of the slot.
- If dust, debris, or any object obstructs the cartridge slot, you can use compressed air or clean the chip on the ink cartridge gently using a soft, lint-free cloth or a cotton swab. Be sure to avoid using any abrasive materials, as they can scratch or damage the chip.
- Dampen the cloth or swab with a small amount of water or isopropyl alcohol, and gently wipe the chip to remove any dust or debris that may be interfering with the connection. Avoid rubbing the chip too hard, as this can also damage it.
- Once the cartridge slot is clean, reinstall the ink cartridge again.
Parting Words
We hope this guide has helped you fix common ink cartridge problems and improve your printing. Dealing with ink cartridge issues can be frustrating, but you can solve them with the right knowledge and techniques.
Remember, fixing printer ink problems requires patience and paying close attention to details. If you've tried everything we mentioned and the issues continue, asking your printer manufacturer or a professional for more help might be helpful.
We hope these tips and solutions have given you the confidence to overcome ink cartridge problems and enjoy good-quality prints. If you need further assistance, feel free to contact our customer service department regarding your CompAndSave products. Talk to us at our toll-free number: 1-833-465-6888 from Monday to Friday, 6:30am-3:30pm PT.